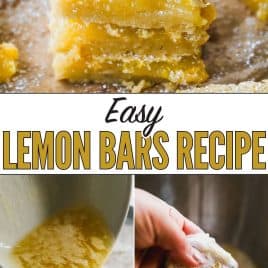
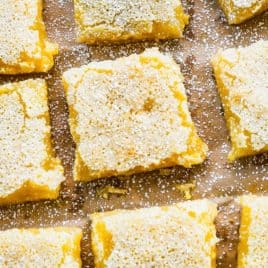
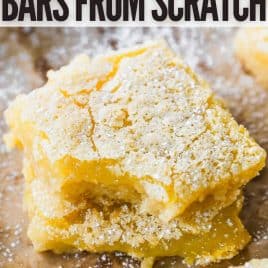

Not only is this the best Lemon Bars Recipe you are ever going to bake, it’s also the absolute easiest. Buttery and bright, with a fabulous lemon curd filing and shortbread crust, they’re like sunshine in a bar.

Why You’ll Love This Easy Lemon Bars Recipe
- Double-the-Lemon Bars. These old-fashioned lemon squares have a superior flavor because they’re made with DOUBLE the lemon juice!
- The Easiest Recipe. The original Betty Crocker lemon squares this recipe is adapted from called for softened butter that is cut into the dry ingredients. My sister Elaine realized that the butter could be melted, then stirred in. Game-changer! It makes the recipe faster, easier, and still yields a fantastic, tender crust! Best lemon bars ever.
- A Dessert for Lemon Fanatics. Like my love for Lemon Poppy Seed Muffins, lemon dessert fervor runs strong in my family. When I’m craving something lemony and I want it N-O-W, this easy lemon bars recipe is the answer.
Watch Me Make This Recipe
5 Star Review
“OMG, these are the easiest, yummiest, gooeyist, best dessert I’ve had in a long time! Made it twice this weekend!”
— Monica —

How to Make Lemon Bars
The Ingredients
- Melted Butter. Not only does melting the butter make these the easiest bars you’ll ever bake, it gives the shortbread crust an extra indulgent, melt-in-your mouth texture.
- All-Purpose and Whole Wheat Pastry Flour. Or just use all-purpose flour if that’s what you have on hand.
- Powdered Sugar. Key for sweetening the shortbread base and dusting over the finished bars.
- Granulated Sugar. Adds sweetness to the tart lemon layer and also adds moisture so the bars don’t crack.
- Lemon Juice and Zest. Gives these bars their bright lemon flavor. If you’d like to experiment with other citrus fruits, try Key limes, navel oranges, tangerines, or pink grapefruit (use a bit less, as grapefruit is more bitter than lemon).
- Eggs. Gives the lemon layer its rich, creamy texture and consistency.
The Directions

- Combine. Add the melted butter to the dry ingredients for the crust.

- Stir. Mix until a dough forms.

- Form the Crust. Press it into a parchment-lined 8×8 pan.

- Bake. It’s done when it’s barely light brown.

- Rub the Sugar and Zest. This evenly distributes the lemon oils throughout the lemon bars.

- Mix. Beat together the lemon filling ingredients.

- Assemble and Bake. Pour the filling into the the hot crust. Return to the pan to the oven and bake until the bars are set. Let cool, dust with powdered sugar, and ENJOY!

Recipe Tips and Tricks
- Fully Bake the Shortbread Base. This is more important than you might think! If you don’t bake it long enough, it can cause the filling to lose moisture and absorb into the crust.
- Don’t Try to Cut Back on the Sugar. I’m usually all for trying to reduce sugar in recipes. Unfortunately this is one where the sugar needs to stay, not just for flavor, but also for achieving the right texture.
- Know When They’re Done. You’ll know when this lemon bars recipe is fully set when no indentation remains when you touch the center with your finger. (Your kitchen will also smell incredible.)
- Don’t Over-Bake. If you leave them in the oven too long, it can cause your bars to crack. The surface of your lemon bars should have small bubble holes, but not large cracks.


Lemon Bars Recipe
Prep: 20 minutes
Cook: 25 minutes
Total: 1 hour
Servings: 24 squares (1 8×8 pan)
Video
My family's favorite lemon bars recipe! Tart lemon curd is balanced with a sweet, buttery shortbread crust, then dusted with powdered sugar.
Email Me the Recipe!
From time to time, we’ll send you Well Plated emails. You can unsubscribe anytime. Have an account? Log In.
Ingredients
- ½ cup unsalted butter (1 stick)
- ½ cup all-purpose flour
- ½ cup whole wheat pastry flour or additional all-purpose flour
- 1/4 cup powdered sugar plus additional for serving
- ¼ teaspoon kosher salt plus 1/8 teaspoon, divided
- 1 cup granulated sugar
- 2 teaspoons lemon zest about three-quarters of 1 large lemon
- 2 large eggs at room temperature
- ¼ cup freshly squeezed lemon juice from about 1 large lemon
- ½ teaspoon baking powder
Instructions
- Place a rack in the center of your oven and preheat the oven to 350 degrees F. Line an 8×8-inch pan with parchment paper and set aside.
- In a small microwave-safe bowl, melt the butter. In a medium mixing bowl, stir together the all-purpose flour, whole wheat pastry flour, 1/4 cup powdered sugar, and 1/8 teaspoon kosher salt. Pour the butter over the top and stir to combine. The batter will be very wet. Press into an even layer in the prepared pan, building the crust 1/2 inch up the sides all around. Bake the crust for 15 to 20 minutes, until barely light brown. Leave the oven at 350 degrees F.
- While the crust bakes, in a large mixing bowl or the bowl of a stand mixer fitted with the paddle attachment, rub the granulated sugar and lemon zest together with your fingers until moist and fragrant. Add the eggs, lemon juice, baking powder, and remaining 1/4 teaspoon salt. With an electric mixer, beat on high speed until light and well blended, about 3 minutes. Pour into the hot crust (no need for it to cool).
- Return to the pan to the oven and bake 25 to 30 minutes, until the bars are set, no indentation remains when you touch the center with your finger, and your kitchen smells incredible. Let cool completely, then dust with powdered sugar. Cut into squares and serve.
Notes
- TO STORE. Lemon bars may be stored for up to 1 day at room temperature. Beyond that, lemon bars should be stored in an airtight container in the refrigerator for up to 1 week.
- TO FREEZE. Once cooled, cut the lemon bars into squares and then wrap individually in foil or plastic and store in an airtight container for up to 3 months.
- TO THAW. Transfer frozen bars to the refrigerator and let thaw overnight.
Nutrition
Serving: 1square (of 24)Calories: 103kcalCarbohydrates: 15gProtein: 1gFat: 4gSaturated Fat: 3gPolyunsaturated Fat: 1gMonounsaturated Fat: 1gTrans Fat: 1gCholesterol: 24mgPotassium: 38mgFiber: 1gSugar: 10gVitamin A: 139IUVitamin C: 1mgCalcium: 9mgIron: 1mg
Related Recipes
Craving something fruity? Here are more of my favorite fruit desserts:


Luscious Lemmon bars! The flavor is sooo amazing
Thank you so much Kelsea!
Delicious and not overly sweet
Thank you Debi!
I’m not very good at baking, but this recipe was so easy to follow! They came out wonderful, and really impressed my new hubby. I’ll be making these again! And maybe experiment with some other citrus too.
Glad to hear you enjoyed it, Becca! Thank you!
Love the lemon to sugar ratio! Just tart enough!
Thank you Danielle!
My husband says these are the best lemon dessert he’s every had! It was easy to make and I appreciate the tip about lining the pan with parchment paper.
Lynne
So glad to hear, Lynne!
I even messed this up a bit (don’t ask:), and it still turned out AMAZING. Will definitely make it again…and right this time:) Maybe Erin will teach me to be a good cook, which I’ve never been! Especially her notes (which I never got from my mother) will do the trick for me! Blessings and Happy 4th! We have so much to be thankful living in America!
Thank you so much, Christine for the kind review! Happy baking!