
This marvelously moist, chocolate-fudge-frosting-topped, and one-bowl wonder of an Instant Pot Cake just made it official: my electric pressure cooker and I are in a serious relationship.

I remember opening the little recipe booklet that came with my Instant Pot, flipping to the dessert section, and thinking, Who would bake in an electric pressure cooker?
Flash forward one year and THIS GIRL RIGHT HERE. I’m an Instant Pot Cake convert. Not only is this cake ridiculously tender and fudgy, but it’s vegan, whole wheat, and naturally sweetened, including the frosting.
I had a ridiculously fun time putting this Instant Pot chocolate cake recipe together. If you own an Instant Pot (this is the model I have and recommend) and are ready to take your relationship from casually texting to appliance you’d bring home to mom (or maybe buy mom for her birthday?), this cake recipe is for you!
And if you don’t have an Instant Pot? Don’t worry, you can still bake this chocolate cake in your oven. I have everything you need in the recipe below.

How to Make the Best Instant Pot Cake
Before we dive into the recipe, let’s walk through some of my tips for making the most perfect, moist, and delicious Instant Pot Cake.
Step 1: Pick the Right Pan
Let’s get this out of the way right now: this cake does not bake in a standard 8-inch or 9-inch round cake pan. Both sizes are too large to fit in a standard 6-quart Instant Pot. You’ll need a 6-inch round cake pan like this one. Six-inch cake pans are available in many baking stores, online here, and you can use them for far more than Instant Pot recipes!
I actually love this smaller-size pan. It’s perfect for a dinner party when you’re hosting a smaller group or anytime you are craving cake but don’t want copious amounts of leftovers tempting you at odd hours.
You also do not need to seek out only recipes written for a smaller pans. Here’s how to use it with standard cake recipes:
How to Use a 6-Inch Cake Pan
- Make a Single Layer 6-Inch Cake from a Single Layer 9-Inch Cake Recipe. Halve any recipe written for a single layer 9-inch cake and bake it in a 6-inch pan. Be sure to check it several minutes early, as the smaller cake may bake more quickly.
- Make an Adorable Double Layer 6-Inch Cake from a Single Layer 9-Inch Cake Recipe. Keep the 9-inch single layer cake recipe the same. Divide the batter between two 6-inch pans. If you don’t want to purchase two 6-inch pans, you can bake the layers one at a time. Be sure to let the pan cool to room temperature in between.
- Make an Double Layer 6-Inch Cake from a Double Layer 9-Inch Cake Recipe. Halve the 9-inch cake recipe. Divide the batter between two 6-inch pans (or use the same pan twice, cooling it in between), unless you want to make a teetering-but-impressive 4-layer 6-inch cake, in which case, I want to see photos!
- For Recipes Written for Cake Sizes other than 9-Inches, I recommend using this conversion link to compare the pan volumes and using your best judgement.
Or just bake this Instant Pot Cake! The recipe is ready to go for a 6-inch pan as-is.
Baking an Instant Pot Cake without a Pan + Other Options
- I do not recommend making this Instant Pot Cake without a pan (meaning spreading the batter in the bottom of the Instant Pot), as the batter will burn.
- If you’d like to make an Instant Pot chocolate bundt cake, you can try using a 6-cup bundt pan that will fit inside the Instant Pot like this one. (I have this one and the handles were too wide to fit, so I haven’t tested a bundt version yet, but if you do, I’d love to hear how it goes!)
- I’ve also heard rumors of baking Instant Pot cakes inside of heatproof bowls but have not played around with this myself yet.
OK, now that I have (hopefully) convinced you to pick up the proper pan, let’s get to the batter, shall we?
Step 2: Make the Instant Pot Cake Batter
This part takes less than 15 minutes, and all you’ll need is two bowls and a spoon. The cake is whole wheat, naturally sweetened in part with maple syrup, and intensely chocolatey.
My tricks to amping up the chocolate are espresso powder (it won’t make the cake taste like coffee; rather, it makes the chocolate pop) and cocoa powder, which makes the Instant Pot cake rich and fudgy.
This Instant Pot cake is vegan, but if that isn’t a concern, you can feel free to swap the coconut oil for unsalted butter and use any kind of milk you like. For a gluten free Instant Pot cake, try swapping the whole wheat flour for a GF 1:1 baking blend like this one.
Step 3: Prepare the Pan
You are going to need to be able to lift the pan out of the Instant Pot once it bakes without burning your fingers. To do this, you can either use the trivet that came with the Instant Pot or, if you don’t have it anymore, make yourself a nifty foil sling to lift it out.
You’ll also need to tightly seal the top of the pan with foil to make sure that steam doesn’t get in and make your cake all mushy. Moist is good. Soupy, wet cake is not.
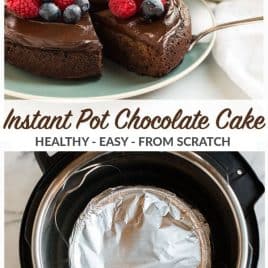
Here’s a step-by-step visual featuring the foil sling. One thing you can’t see in the photo: place a small, heatproof bowl upside down in the Instant Pot before adding the pan on top of it so that the pan is slightly elevated and does not touch the bottom of the pot directly.

And here’s what it looks like if you have the handled trivet (no upside down bowl needed). Both methods work beautifully.

Step 4: Pressure Cook the Cake
Although the Instant Pot has plenty of fancy features I considered to cook the cake (I won’t be surprised if upcoming models include an Instant Pot cake function), to keep the recipe as simple as possible and accommodate different brands of electric pressure cookers, I went the simple route and cooked it on high pressure (manual).
- Add 1/2 cup water to the Instant Pot. This will prevent the dreaded “Burn” warning.
- Lower the cake into the Instant Pot via either the foil sling or the trivet.
- Seal and cook on high pressure for 35 minutes, then vent immediately.
- Let the cake cool, then it’s time for…

Step 5: The Frosting
Step 5: The Frosting
Even if you think you are not a frosting person, do not skip this one. It’s lusciously creamy, dreamy dark chocolatey, and not at all overly sweet or greasy. This frosting is so tasty, I was dipping it with pretzels and licking the spoon like a lollipop by the end.
This chocolate frosting is also healthy as far as frostings go. Instead of butter, I used avocado, cocoa powder, and maple syrup. It’s legitimately delicious and likely to be my go-to chocolate frosting for many a cake to come.
Step 6: Slice and Serve
- Add berries to the top of the cake for color and juicy sweetness.
- Warm up individual slices and serve with vanilla ice cream, whipped cream, or coconut cream (how my friends and I devoured most of it).
- Eat the cake directly from the container with your fingers. In your PJs. While no one but the dog is watching (how I devoured the last remaining slice).

What do you think? Would you bake a cake in your Instant Pot? If you decide to try the recipe, please be sure to leave a comment. I love hearing from you!
Instant Pot Cake
Email Me the Recipe!
From time to time, we’ll send you Well Plated emails. You can unsubscribe anytime. Have an account? Log In.
Ingredients
FOR THE CAKE:
- ½ cup unsweetened almond milk or milk of choice
- 1 teaspoon apple cider vinegar, white vinegar, or lemon juice
- ¾ cup white whole wheat flour
- ¼ cup unsweetened cocoa powder sifted if clumpy
- 1 teaspoon espresso powder optional; it will create a more intense chocolate flavor
- ½ teaspoon baking soda
- ¼ teaspoon kosher salt
- ¼ cup pure maple syrup
- ¼ cup coconut oil melted and cooled to room temperature
- 3 tablespoons granulated sugar
- 1 teaspoon pure vanilla extract
- ¼ teaspoon pure almond extract optional but delicious
FOR THE FROSTING:
- 1 medium avocado very ripe
- ½ cup unsweetened cocoa powder sifted if lumpy
- Tiny pinch kosher salt
- ¼ cup pure maple syrup
- 1 teaspoon pure vanilla extract
Instructions
- If you have a handled trivet: Place it in the bottom of a 6-quart or larger Instant Pot with the handles up so that you can lift the cake out later. Skip the foil sling in Step 2 and move on to Step 3. If you no longer have the trivet, use a small heatproof bowl turned upside down and placed in the center and proceed to Step 2. If your trivet does not have handles, place it in the bottom and proceed to Step 2.
- Make a foil sling to lift the pan out of the Instant Pot: Take a long (about 18 inches) piece of foil and fold it over itself the long way (elementary school would call this “hot dog style”) several times to create a long strip. Make sure it is long enough to reach all the way around the bottom of the pan and stick up several inches over the top of each side. Set aside.
- In a medium mixing bowl or a large measuring cup, stir together the almond milk and vinegar. Let sit 5 minutes.
- In a large mixing bowl, whisk together the flour, cocoa powder, espresso powder, baking soda, and salt until well combined.
- To the bowl with the almond milk mixture, add the maple syrup, coconut oil, granulated sugar, vanilla extract, and almond extract. If the coconut oil solidifies, microwave the bowl in 10-second bursts until it reliquifies. Whisk until well combined. Add the liquid ingredients to the dry ingredients. By hand with a wooden spoon or spatula, stir just until the flour disappears. It will seem airy and could be a bit lumpy but will be delicious after it’s baked.
- Generously coat a 6-inch round cake pan with nonstick spray. Line the bottom with parchment. Coat with spray a second time. Pour the batter into the pan and smooth the top. Cover the top of the pan completely with a double layer of aluminum foil. Really pinch the foil around the top of the pan to create a seal and prevent moisture from creeping in while the cake bakes. Add 1/2 cup water to the Instant Pot (this will prevent it from registering a “Burn” warning).
- If using the foil sling, place the cake pan in the center of the foil strip, then pull the strip ends up around the pan. Lower the cake into the Instant Pot, ensuring the ends of the foil poke up on either side of the pan. If the strips stick up out of the Instant Pot, fold them inward towards the center so that you can close the lid. If not using the sling, place the pan directly on the handled trivet.
- Cover and seal the Instant Pot. Cook on high pressure (manual) for 35 minutes. When the cooking time is complete, immediately vent the Instant Pot to release any remaining pressure. Carefully open the lid.
- Gently lift the cake from the Instant Pot by using the two ends of the foil sling or trivet handles. Place the pan on a wire cooling rack, then unwrap and discard the foil cover. Let the cake cool in the pan for 10 minutes. Run a dull knife, such as a butter knife, around the edge of the pan to loosen the cake, then gently invert it and transfer it to the rack. Let cool on the rack completely.
- While the cake cools, prepare the frosting: In a food processor or blender, pulse the avocado, cocoa powder, and salt in 3- to 5-second bursts until mostly combined. Add the maple syrup and vanilla. Process until smooth and creamy, stopping to scrape down the processor a few times as needed. Try not to eat it all right then and there. Place the cooked cake on a serving plate. Frost, slice, and enjoy!
Notes
- This yields enough frosting to frost the top and sides of the cake VERY generously. Depending upon how much frosting you like, you may only need two-thirds to three-quarters of it. The extra is delicious dipped with pretzels, on cookies, and/or eating by the spoonful!
- Nutrition calculated with 3/4 of the frosting (see note above).
- TO BAKE IN THE OVEN: Place a rack in the center of the oven and preheat the oven to 350 degrees F. Prepare the cake as directed, skipping the foil sling and cover. Bake for 25 to 35 minutes, until a toothpick in the center comes out mostly clean with just a few moist crumbs (but no wet batter) clinging to it. Check a few minutes before the 25-minute mark for doneness, as all ovens bake differently.


Hello Erin!
I’m new to baking and was very intrigued by your recipe since I’m a big fan of Instant Pot.
My cake turned out very thin and it didn’t raise at all. It looks veeery different from yours.I followed instructions with the exception of milk, used regular milk. I took a picture and I with I could share it here. Could you advice what could have go wrong?
Hi Luba, sorry to hear that there were problems with the cake. It’s hard to know what might of went wrong without being in the kitchen with you. My first question would be, did you use a 6 inch round cake pan? Also was your baking soda fresh, sometimes that can result in a flat cake. I wish this would of been a hit!
I made this tonight and the cake tasted amazing and I want to try making again but it didn’t rise!! It was super flat like an inch or less high I can’t figure out what I did wrong! But man it tasted great! I see you have 1x, 2x, 3x which should I use for the 6 inch cake?
Hi Stephany! So glad you enjoyed the cake. The 1x recipe is for a 6 inch cake. I’m sorry to hear that there were problems with the cake. It’s hard to know what might of went wrong without being in the kitchen with you. Was your baking soda fresh, sometimes that can result in a flat cake. I wish this would of been a hit all the way around!
This turned out very undercooked. It did not taste much. I was very disappointed.
Hi Louise, if it was undercooked the best thing to do was put it back under pressure and allow it to continue to cook for a few more minutes. I haven’t had this problem before so it’s hard to know what went wrong without being in the kitchen with you.
Made this today to serve to vegan friends and, whilst it tasted good, the cake didn’t rise. I followed the recipe word per word and used the pan that fits into the pressure cooker.
I’m sorry to hear you had trouble with the cake, Cat. The finished cake would not be more than 4-5 inches tall. How tall was yours? Also sometimes using older baking soda would affect a cake from rising or puffing up, so I would double just the expiration date, just to be sure.
I keep seeing the comments say it didn’t rise and in the comments people ask if the baking powder is fresh but the recipe doesn’t call for baking powder, only baking soda. Is this a mistype?
Hi Madi, that was a typo in the comments. It’s baking soda! Hope you enjoy it!
I am excited to make this cake. I have a question. Can I cook two layers at the same time? What would I put in between the layers while in the pot? Would the cook time be different?
Hi Nancy! I have only ever done one layer so I can’t advise on how it would work with two. If you decide to experiment, let me know how it goes!
Well, I cheated and used a box recipe but I have a few little tricks on my own to make my cake very moist. I purchased a Silver baking pan size of 7.5 fits perfect in the Insta pot for one box cake. Besides that I found your recipe with the water and the foil and I also have the rack and I just first of the water immediately from the Insta pot and I let it cool for 15 minutes always on some form of rack and then I transferred it to a cake tray and let it cool another 45 minutes and then Icing turned out fantastic! I live in the mountains high altitude always add extra flour to my recipe. Little less water little less oil add pudding and add applesauce. Also, I love using the spray nonstick baking spray with flour bakers joy. It’s super quick and easy. That’s my secrets to my cake recipe. I always get compliments.
Glad it worked out for you Michele!
what can I use instead of the saturated fat coconut oil? Becel?
Hi Anne! I’ve only tested the recipe as written. If you decide to experiment with something different, let me know how it goes! Hope you enjoy!
Made 2x recipe in 9 in round pan and baked in conventional oven. Simply delicious!
Hi Vinita! So glad you enjoyed the recipe! Thank you for this kind review!
Hi! As I’m preparing to try my first IP cake I have one question (at the moment anyhow!): Fat Daddio’s calls for just 2 cups of batter in the 6″ x 2″ pan yet ½ of a 9″ recipe is 3 cups. Can you clear my conundrum?!?! : -)
Hi Linda, I’m not familiar with what you are talking about but I can only comment on the recipe I have tested. This one works well the way it’s written. Enjoy!
Is it hot water your using or cold water because hot water would help pre-heat… whatever cake recipe I do whether packet or homemade it never rises… its the same if I use the pressure cooker setting or the bake setting.
Hi Marie, we are not using hot water for this recipe. Enjoy!
Tastes great and very moist! However, did not rise, and I used a brand new box of baking soda.
I also used regular (dairy) milk (for allergy reasons), and I’m wondering if the increased protein/ fat in the dairy milk somehow affected the ability of the acid (vinegar) to activate the baking soda?
I will try again using a mix of baking soda and baking powder with the regular milk.
I used the two tiered 6″ pan set that Instant Pot sells, and the 2x version of the recipe– the pans were less than half full, but that may be remedied if I can get it to rise.
Thanks for a great recipe, the family really like the flavor!
Hi Leslie, I don’t believe changing the milk would cause it not to rise. I believe it’s due to the two tiered pan set. I only tested this with a one pan insert. Did you find that you needed to cook it long? How tall was each cake?
Didnt rise. Same with other comments.
Hi! This isn’t a super tall cake, but it shouldn’t be flat as a pancake either. I find it a bit dense, which is a prodcut of the instant pot, but dense in a super yummy way. Did you enjoy the taste?
Hi Erin,
I didn’t actually make your recipe but went right out on a limb and used the method to make a boiled fruit cake! I am living on a sailing boat and so only have the smallest instant pot … great thing to have on board .. I use it all the time! Having a small cooking pot meant I had to halve my grandmothers recipe and as it was my first try I did make a bit of a mess of things. I cooked the cake for 16 mins on manual high pressure, released pressure immediately when done and left to cool. The big reveal revealed a sort of stodgy cake … sort of fudgey and not risen, but it tastes okay even though texture is not cakey. I can see the chocolate fudge cake would be much better suited. I wonder if you have tried making a fruit cake??
Hi Sarah, I have not tried to make a fruit cake before in the Instant pot. Hope you give this one a try!
Looking forward to trying this recipe! Can I substitute soy milk for the almond milk?
That should work. Enjoy Kay!
This was the very first thing I made in my new instant pot and it was delish! I was concerned with all the reviews about it being flat but mine was not. It was about an inch thick and so moist. I didnt have avocado so I made a simple chocolate peanut butter frosting.
So glad it worked well for you, Jenn! Thank you!