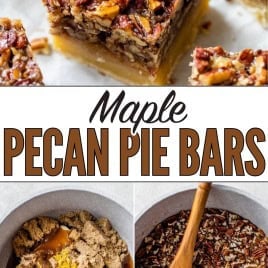

Sweet and salty, flavored with maple syrup, and easier than making a traditional pie, these Pecan Pie Bars are the rich, buttery indulgence we all deserve, especially this time of year!

These pecan pie bars are like portable slices of pecan pie—and so much easier to make!

A buttery shortbread crust that’s tender but sturdy enough to pick up with your fingers. A melt-in-your-mouth filling lush with maple and brown sugar and positively chock-a-bloc with deeply toasty, crunchy pecans.
After writing that, I’m craving a pecan pie bar right now.
- These bars are made without corn syrup; instead, they’re sweetened with maple syrup and brown sugar, which adds more more dimension to the flavor.
- While recipes like Bourbon Pecan Pie are delish, a pie only serves so many. This recipe yields a big batch. You’ll have enough to serve at a party, give as gifts, or if you find them as easy to eat as I do, keep yourself in happy supply for as long as you can resist them.
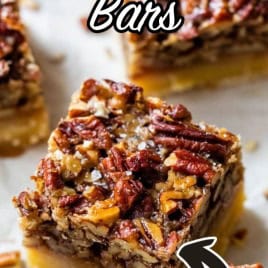
- If you love a sweet and salty treat, these pecan pie bars will be your jam. A finishing sprinkle of flaky sea salt ties it all together and saves these bars from many a classic pecan pie’s greatest transgression: being cloyingly sweet.
5 Star Review
“I made these last night and they were phenomenal”
— Adelyn —

Key Ingredients
You’ll find the full list of ingredients in the blog post below, but here are some notes to keep in mind.
- Butter. Butter is a heavy-hitter in this recipe, so if there was ever a time to splurge for the fancy European stuff, it’s here.
- Maple Syrup. I wanted to make pecan pie bars without corn syrup, so I opted to use maple syrup instead. The warm flavor really shines through and is a beautiful pairing with pecans.
- Lemon Zest. Unnoticeable on its own; it’s here to make the filling pop and balance the sweetness.
- Heavy Cream. A necessity to make the filling rich, creamy, and caramel-like. You MUST use heavy cream. Do not swap milk or even half and half or the filling may seize.
- Pecan Halves. These bars are fully loaded for maximum pecan toastiness and crunch.
- Sea Salt. My star addition that takes the flavor to the next level. A flaky sea salt like Maldon or fleur de sel works best.
How to Make Pecan Pie Bars


Start the Crust (photo 1). Mix together the shortbread crust. Make sure the butter is softened before you start! You’ll know it’s softened enough when you can gently press it with a finger and it leaves an indentation. If your butter is cold, it will stick to the beaters and it won’t mix smoothly into the rest of the ingredients.
Bake (photo 2). Press into a parchment-lined pan and bake for 15 minutes at 350 degrees F. (If you want to get a head start, you can prepare the dough for the crust, press it into the baking dish, and par-bake as directed. Cover and refrigerate it for up to 24 hours.)
Make the Filling (photo 3). Meanwhile, add the butter, maple syrup, and sugar to a saucepan. Simmer to create a yummy caramel, then stir in the pecans (photo 4).
Bake and Chill. Pour the pecan filling over the crust. Bake the pecan pie bars for 25 to 30 minutes. Let them cool completely, then cover, and chill for at least 6 hours.
Serve. Slice as desired, then serve at room temperature or slightly warmed in the microwave. ENJOY!
. Rich, buttery, and even better than pecan pie!")
Recipe Variations
- Chocolate Pecan Pie Bars, Option 1. Add in chocolate chips before pouring the batter into the crust.
- Chocolate Pecan Pie Bars, Option 2. Bake the recipe as directed, then drizzle the cooled bars with melted chocolate. Let the chocolate set, then slice as directed.
- Bourbon Pecan Pie Bars. Add 3 tablespoons of bourbon to the saucepan with the butter, syrup, sugar, and lemon zest. (Bourbon fans, these Bourbon Balls are another fabulous holiday treat!)
How to Cut the Pecan Pie Bars
Heads up! These bars do need to be chilled completely before they are cut. Embrace them as a stellar make-ahead dessert.
- First, use a large, sharp knife to loosen the bars all the way around the edges of the pan. Then, lift the bars out of the pan using the parchment paper that’s hanging over the sides.
- The bars will be thick and heavy, so if your paper starts to tear, cut the whole pan of bars in half or quarters first, then with a spatula, lift it onto a cutting board in sections.
- These bars are rich, so I like to cut them into smaller pieces (even though I usually end up taking more than one!).

Pecan Pie Bars
Video
Email Me the Recipe!
From time to time, we’ll send you Well Plated emails. You can unsubscribe anytime. Have an account? Log In.
Ingredients
FOR THE CRUST:
- 1 ½ cups unsalted butter at room temperature (3 sticks)
- ½ cup granulated sugar
- 2 large eggs at room temperature
- 1 teaspoon pure vanilla extract
- 3 cups all-purpose flour
- ¼ teaspoon baking powder
- ¼ teaspoon kosher salt
FOR THE FILLING:
- 1 ½ cups unsalted butter
- ⅔ cup pure maple syrup
- 2 ¼ cups light brown sugar or dark brown sugar
- ½ teaspoon grated lemon zest about ½ medium lemon
- 3 tablespoons heavy cream
- 1 teaspoon pure vanilla extract
- 1 ¼ pounds 20 ounces pecan halves, coarsely chopped
- Flaky sea salt such as Maldon or fleur de sel (optional)
Instructions
- Place a rack in the center of the oven and preheat the oven to 350°F. Grease a 9×13-inch pan with cooking spray or line it with parchment paper, leaving an overhang on the sides to lift the finished bars out. Set aside.
- Make the crust: in the bowl of a stand mixer fitted with the paddle attachment or a large mixing bowl, beat the butter and granulated sugar on medium-high speed, until light and fluffy, about 2 minutes. Scrape down the bowl. Beat in the eggs and the vanilla, just until incorporated.
- In a separate large bowl, whisk together the flour, baking powder, and salt. With the mixer on low speed, slowly add the dry ingredients to the butter mixture, stopping as soon as the flour disappears.

- Transfer the dough to the prepared pan. Press it evenly into the pan, building it up on the sides all the way around by about 1-inch. The dough will be very sticky, so if it clings to your hands, use a sheet of plastic wrap to press it down and avoid sticking. The crust will seem fairly thick, but go with it. Bake the crust for 15 minutes, until it is set but not yet browned. If it puffs up unevenly in the center, use the tines of a fork to prick it lightly on the surface. Set aside to cool.

- While the crust cools, prepare the filling: in a large, heavy-bottomed saucepan, combine the butter, maple syrup, brown sugar, and lemon zest.

- Cook over low heat, stirring the mixture with a wooden spoon, until the butter is melted. As soon as the butter melts, increase the heat to a boil. Boil for 3 minutes (set a timer!), then remove from the heat.

- Stir in the heavy cream, vanilla, and chopped pecans. Avoid the temptation to touch or eat the pecan filling, as it is very very hot. Pour the filling carefully into the center of the crust, then with the back of a spatula or fork, spread it into an even layer (some of the crust may show at the edges; try to avoid the batter seeping between the crust and the pan). Sprinkle a generous pinch of flaky salt over the top. It will be quite thick and fill the pan almost all the way to the top.

- Bake for 25 to 30 minutes, until the filling is set at the edges and when the pan is jiggled, the center has some movement but does not seem excessively liquidy. Place on a cooling rack and let cool completely to room temperature, then cover the bars with plastic and place in the refrigerator to chill for at least 6 hours, preferably overnight. With a knife, loosen the bars from the sides of the pan, then lift them onto a cutting board (see blog post above for tips). Slice into bars of the desired size. Enjoy at room temperature or slightly warmed in the microwave (my favorite!).
Notes
- TO STORE: You do not need to refrigerate pecan pie bars, if you will be enjoying them within a day or two. These keep well at room temperature for up to 2 days and in the refrigerator for up to five days.
- TO FREEZE: Lay fully cooled bars onto a parchment-lined baking sheet, and place in the freezer until frozen solid. Then, place the frozen bars into a freezer-safe ziptop bag or airtight container and store in the freezer for up to 3 months.
- TO SERVE AFTER FREEZING: If the bars are frozen, let them thaw overnight in the refrigerator. Let them come to room temperature prior to serving or warm them up a little in the microwave. If you do not have a microwave, you can try warming them in a low oven. Tent the pan with foil to keep the top from over browning.


Made these again for Christmas and they were a HUGE HIT. I haven’t had the issues others have either time I’ve baked them. Will plan on repeating next year!
I am so disappointed with this recipe. When I saw that the instructions for making the caramel used time as a measure of doneness rather than temperature, I should have stopped right there and looked for a different recipe. This is a very expensive dessert to make (1.5 pounds of butter and 1.25 pounds pecans), and my end result after baking was a hard candy like structure. Nothing at all like the photo or pecan pie. I threw out the entire pan. Save your money or look for a different recipe!
Nancee, this breaks my heart! Your time and money on ingredients and the energy it took to make this is a massive bummer to say the least. It’s not meant to be a candy caramel, so I didn’t include a temp (also most folks don’t have a candy thermometer so I just didn’t think it was necessary). As I mentioned in the recipe, I based these off of Ina Garten’s recipe and she uses the same time measure with good results. Regardless, I know this is a loss for you and I’m sorry!
These were a big hit at thanksgiving dinner yesterday. I had to pass on the recipe to a friend who thought they were fantastic. My only problem in making them was there was too much filling for the pan. I saved the left over and froze it. May make a mini batch for Christmas!
I made this recipe with the exact ingredients & amounts specified and it came out very well, however, here are the adjustments I will apply next time. My crust came out unevenly and there was too much dough, so I tended to make it too thick around the edges and corners. In the future, I will make and use some sort of depth gauge (and more caution!) when forming my crust. I will also resist using all of the dough if there seems to be extra. The dough’s consistency may even allow me to roll it out for proper thickness the next time I try this, which I’ve noted on my recipe print out. I used both spray and parchment in my glass 9 X 13 and that worked well. After 30 minutes of baking at 350°, there was only a small area that didn’t appear “too jiggly” when I shook the pan. I ended up baking for about 45-47 minutes before I was satisfied with the doneness. So next time I will set timer for 40-42 minutes and that should be about right. (I’m figuring in opening-the-oven heat loss added about 5 minutes this time) Keep in mind, this is for MY oven- yours may be different. For the brown sugar, I used dark, it’s what I had on hand. The flaked salt certainly adds to the delightfulness of this recipe, so try to avoid skipping it if you can, even though the bars will be just fine without it. This recipe is a keeper, but I will probably only make it on occasions where I plan to give away to others, (parties) due to the extreme richness- and will enjoy standing by to collect the compliments. Thank you for a great Holiday recipe.
Sorry to hear that P. I’m sorry I am afraid it can’t be cut back! This is one of those over the top desserts I’m afraid.
That’s great to hear Kimberley, thanks for sharing!