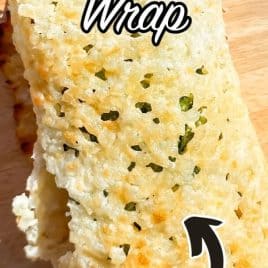

Two ingredients are all you need for this high protein, low carb Cottage Cheese Wrap! Spread cottage cheese onto a parchment-lined baking sheet, top with Parmesan, and bake until golden. You can use it as a flatbread, or fill it with any of your favorite sandwich ingredients!

Email Me the Recipe!
From time to time, we'll send you Well Plated emails. You can unsubscribe anytime. Have an account? Log In.
The two-ingredient cottage cheese wrap that transformed my lunch.

From Cottage Cheese Pizza to Cottage Cheese Eggs, I’m beginning to wonder if there is anything cottage cheese can’t do.
I had previously made my cottage cheese wraps by blending together cottage cheese with eggs, then spreading onto a sheet and baking, but that approach required dirtying my blender, which is not something I’m in the mood to do on busy days.
Enter this two-ingredient, no blending cottage cheese wrap.
All you need to do is spread cottage cheese onto a baking sheet directly from the container, sprinkle it with Parm and pop into your oven for 20 to 25 minutes. Out pops a golden cottage cheese flatbread, ready to be filled with anything you fancy.
My current favorite filling is a Caesar salad made with romaine, diced chicken, and my favorite Caesar Dressing.
The cottage cheese wrap is golden and crunchy at the edges with a slight Parmesan flavor. It reminds me of a giant Parmesan crisp in the best possible way!


Recipe Tips and Tricks
- Use oil AND parchment paper. You don’t want the wrap to stick.
- Cool the wrap COMPLETELY. If you try to remove it too soon, it will fall apart.
- Don’t use fat free cottage cheese. You need the fat to hold the wrap together and make it taste satisfying.
- Loosen with a spatula. A thin, flexible spatula like this fish spatula is perfect for lifting your flatbread from the paper without tearing it.


Cottage Cheese Wrap
Video
Email Me the Recipe!
From time to time, we’ll send you Well Plated emails. You can unsubscribe anytime. Have an account? Log In.
Ingredients
For the Cottage Cheese Flatbread
- 1 cup low fat cottage cheese or full fat; do not use fat free
- 3 tablespoons grated Parmesan cheese
- oil or nonstick spray
For the Chicken Caesar Salad Filling (Yields 2 Salads)
- 1 chicken breast lightly pounded into an even thickness
- ½ tablespoon olive oil
- 1 teaspoon paprika
- ¼ teaspoon garlic powder
- ¼ teaspoon kosher salt
- Pinch ground black pepper
- 2 cups chopped romaine
- 3 tablespoons Caesar Dressing more to taste
- 2 tablespoons grated Parmesan
Instructions
- Make the flatbread: Preheat the oven to 400°F and line a baking sheet with parchment paper. Brush the paper with oil or coat generously with nonstick spray. Spread the cottage cheese into an even layer creating a flatbread shape. Sprinkle with 3 tablespoons Parmesan.

- Bake the cottage cheese wrap for 20 to 25 minutes, until golden and set. At 10-minutes, remove it from the oven. If the curds have spread out a lot, use a spatula to very gently scoot them closer together, then continue baking. Let cool completely, then loosen with a spatula and carefully peel off of the parchment.
- Make the chicken: Drizzing the chicken with the oil and sprinkle with the paprika, garlic powder, salt, and pepper, rubbing to coat it evenly. Air fry at 375°F, until the chicken reaches 165°F on an instant read thermometer (I remove mine at 155°F then let it come to temperature as it rests), about 8 minutes for small breast or all the way up to 14 for a larger breast. Let cool 5 minutes, then dice. (You can also bake in the oven at 425°F for 12 to 18 minutes depending upon the size of your breast.)
- In a bowl, toss together the chicken, romaine, 2 tablespoons Parmesan and the Caesar dressing.
- Pile half inside of the wrap, roll, and enjoy. Save the second half for a future wrap.


Notes
- Nutrition is calculated with half the amount of the Caesar salad ingredients
- Wrap is best enjoyed the same day it is made. If you have extra break it into pieces, refrigerate, and serve over salads like “croutons.”


I didn’t expect the cottage cheese to bake into something I could actually roll up, but it worked pretty well! It’s definitely not your classic wrap, but it held up with the filling and gave the whole thing a lighter feel. Great option if you’re trying to cut back on carbs or just want something new. Loved it! Thank you for sharing!
So glad you enjoyed it, Meggan! Thank you!
Patience was definitely key when it came to letting the flatbread cool down completely. When it first came out of the oven, it was still a little soft and fragile. But as it cooled, it firmed up quite a bit and was much easier to handle and peel off the parchment paper. I tried to rush it a little at first, and it started to stick, so definitely don’t skip that step!
So glad you enjoyed it, Analain! Thank you!
I had my doubts, but this recipe totally works. It held together better than I expected. The choice of a chicken Caesar salad filling was spot on. I enjoyed making this recipe. Thank you so much!
So pleased to hear it, thanks Angie!
I wonder what I might be doing wrong, as the flavors are definitely there, but it’s not working as a flatbread, everything in the middle seems to be still soft and not cooked… I tried 4% the first time, 2% the second time, followed the tips and tricks, Really let it cool down the second time, found that I needed to have it in the oven for at least 30 minutes, and likely didn’t seem like enough. The flavors are fantastic so I almost use these as croutons!
Hi Lisa! I’d check the brand of cottage cheese that is being used. The one I use is 2%. Also I would try to spread it out just a little more on the sheet pan. Hope this helps!
I was excited to try this “wrap” recipe but must admit I was a little apprehensive regarding the wrap up ability so I ate it ‘flatbread’ style with slices of roasted chicken and it was delicious! The wrap was cooled for about 30 minutes and came off the parchment with ease (I kind of over did the oil because I did not want it to stick). Looking forward to making it again but will use a non-stick spray next time. Thanks for another great recipe!
So glad it worked well for you, Cheryl! Thank you!
They look good. Just cooling them on the tray. But I had to mo u slot of liquid from the cottage cheese. Think I will strain it prior to reduce this effect. Have you had this experience?
Hi Margie, I do know some cottage cheese brands seems to have more liquid then others, if I am understand your question. So. you could strain it some if it seems to have too much. I haven’t ran into this problem myself. Hope you enjoyed it!
I had same problem as Margie with cottage cheese to much liquid. What brand cottage cheese do you use? Mine were good but feel apart so my tacos turned into taco salad.
Hi Reese, I normally use good culture cottage cheese. If you find it to have too much liquid, I’d drain it first. Hope this helps!