
After a day of running around the bases, we deserve the easy home run. That is when you make this nutritious Taco Skillet. A one-pan pleaser made with lean, healthy ground beef, rice, black beans, and whatever other Mexican-ish ingredients you care to throw its way, this recipe is the kind of meal I make when I don’t know what else to make.

5 Star Review
“I have made this twice, and both times it turned out perfectly, no modifications necessary. This is an excellent, more flavorful, and healthier alternative to basic beef tacos.”
— Andrea —
Mexican food? Always. Wholesome ingredients? Necessary. One pan to wash at the end? GRAND SLAM.
Lately, I’ve been growing a bit weary of my own cooking, and it’s been harder to find the energy to make dinner at the end of the day. Do you find the same?
Whenever I’m not in the mood for anything, Mexican food turns out to be the answer to everything.
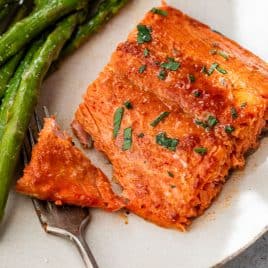
When I sat down with a plate of this healthy taco skillet with rice, I realized it was exactly what I’d been craving.
This easy, healthy beef and rice recipe is a spinoff of some of my other favorite Mexican one-pan wonders, like this Mexican Chicken and Rice, Fiesta Chicken, and Mexican Shrimp.
Healthy, simple ground beef recipes like these Korean Beef Bowls and Ground Beef Quesadillas have been adding variety to our routine lately, so I decided to try doing a version of my Tex-Mex faves with ground beef.
Delicious. The ground beef gives this recipe old-school taco flavor, and it hit the spot.
Of course if you prefer, you can swap the ground beef and make a turkey taco skillet or use ground chicken if that is what you have around. I have ideas for a vegetarian version below too.
tip!
For more great ground beef recipes, check out Ground Beef Dinner Ideas.
Pile this taco skillet with veggies into your bowl as is, or use it in one of the tasty taco and burrito-ish spin-offs suggested below.
Highly encouraged: all of your favorite Mexican toppings and a Skinny Margarita to match.
Suddenly, I’m feeling inspired! I hope that you are too.

How to Make a Healthy Taco Skillet
The prep work here is minimal—just follow the recipe, and it practically cooks itself.
The Mexican-inspired ingredients and flavor profile are familiar and comforting, and the more wholesome ingredient line up means you’ll feel good about your choices at the end of the meal.
It’s certainly going to be one of your favorite healthy ground beef casseroles, made easy in the skillet. If you are looking for a more traditional ground beef casserole that’s baked in the oven, try this Mexican Casserole.
The Ingredients
- Lean Ground Beef. I love light ground beef recipes (like Ground Beef Casserole), so I used 93% lean ground beef, which is lower in fat than regular ground beef. You could swap in ground turkey or chicken instead if you prefer to make this taco skillet without beef.
- Bell Peppers. You can use red or green peppers here. I love adding bell peppers to Mexican-style recipes both for their flavor and nutritional value. They’re a great source of vitamin c and fiber.
- Spices. I used a combination of chili powder, garlic powder, cumin, oregano, salt, and pepper for the perfect balance of heat and craveable taco flavor.
- Salsa. Use a 15-or 16-ounce jar of your favorite chunky salsa (we picked a medium spicy one).
- Black Beans. One of my favorite additions to any Mexican recipe. They’re packed with filling protein and fiber. You could use another kind of beans here if that’s what you have on hand; pinto would be especially good, and I think most types would work just fine.
- Brown Rice. Do not use short grain or instant rice in this recipe, as they will become mushy.
- Cheese. For the delicious, decadent layer of gooey cheesy goodness on top. I used Monterey Jack cheese here, but you could use cheddar, pepper jack, or a Mexican blend.
- Toppings. The sky’s the limit! Our favorites are cilantro, jalapeno, avocado, salsa, and sour cream or plain Greek yogurt.
The Directions

- Sauté the beef, onion, and peppers in a large ovenproof skillet. Once the meat is browned, stir in the spices. Add the beans and rice, stirring to combine.

- Stir in the salsa and part of the water. Bring to a boil, then cover the skillet, and let it simmer. Check it every 10 minutes to stir, scrape up any pieces stuck to the bottom, and add splashes of water if needed.
- Scatter the cheese over the top, then place the skillet in the oven, broiling until the cheese has browned. Serve with your toppings of choice, and DIG IN!
Cooking Tip
The best way to cook ground beef thoroughly for this recipe is to brown it in a skillet first. To make sure you cook the ground beef safely, use an instant read thermometer before serving to check that it has reached 160 degrees F.

Recipe Variations
- Gluten Free Taco Skillet. No changes needed, as this recipe is gluten free naturally.
- Vegetarian Taco Skillet. Swap the ground beef for a crumbled meat substitute, or simply omit the beef and use a second can of beans. You could use another can of black beans or change it up with pinto beans or kidney beans.
- Low Carb Taco Skillet. For a keto-friendly taco skillet, sauté the beef, onion, and vegetables with the spices, and omit the water and salsa. Serve with cauliflower rice, and top it off with the salsa for flavor.

Serving & Leftover Ideas
- With Chips. Use your favorite tortilla chips, and scoop up the gooey, cheesy goodness from plates or right out of the skillet.
- As a Burrito Skillet. Wrap the filling completely inside a flour tortilla, and serve it as a burrito.
- As a Quesadilla. Serve this taco skillet with tortillas (corn or flour), and fold them in half for a quesadilla; add some extra cheese to the filling and toast it in a skillet first to give it a nice crust on the outside.
- As a Salad. If you prefer your healthy ground beef recipes low carb, place the filling on top of a bed of romaine lettuce for a filling and low-carb take on a taco salad (see this Taco Salad for some additional inspiration).
- With Pasta. If you follow the directions above for making this a low carb taco skillet, try serving the leftovers as a taco skillet with pasta.
What to Serve with this Taco Skillet


Mexican spices, juicy lean ground beef, and hearty beans and rice: if your mealtime desires are anything like ours, no matter when you last had this combination, chances are you’ll be happy to find it on your plate again!
If you make this beef taco skillet recipe, please leave a comment to let me know how it goes! Your comments and 5-star ratings always make my day and really help make this site helpful to others too.

Taco Skillet
Video
Email Me the Recipe!
From time to time, we’ll send you Well Plated emails. You can unsubscribe anytime. Have an account? Log In.
Ingredients
- 1 tablespoon extra virgin olive oil
- 1 pound 93% lean ground beef
- 1 small yellow onion chopped
- 2 red or green bell peppers chopped
- 2 teaspoons chili powder
- 2 teaspoons garlic powder
- 1 teaspoon cumin
- 1 teaspoon oregano
- ½ teaspoon kosher salt
- ½ teaspoon ground black pepper
- 1 can low-sodium black beans 15 ounces, rinsed and drained—or swap kidney or pinto beans
- 1 cup long or medium-grain brown rice do not use short grain or instant, as it will become mushy
- 1 15- or 16-ounce jar chunky salsa mild or medium (or swap fire roasted diced tomatoes in their juices and add additional spices to taste)
- 1 ½ to 2 cups water divided
- 1 cup shredded Monterey Jack cheese or swap cheddar, pepper jack, or a Mexican blend
- Optional — for serving: chopped fresh cilantro, lime wedges, sliced jalapeno, shredded cheese, diced avocado, prepared salsa, sour cream, or plain Greek yogurt
- Optional to make tacos, burritos, or quesadillas warmed whole wheat flour or corn tortillas
Instructions
- Heat the olive oil in a large, ovenproof skillet or Dutch oven with a tight-fitting lid over medium-high heat. Once hot and shimmering, swirl to coat the pan, then add the beef, onion, and bell pepper. Cook for 3 to 5 minutes, until the beef is browned and cooked through and the onion is beginning to soften.
- Add the chili powder, garlic powder, cumin, oregano, salt, and pepper. Stir to coat the beef and cook 30 seconds. Add the black beans and rice. Stir to coat once more.
- Add the salsa and 1 1/2 cups water. Stir to combine the ingredients. Bring to a gentle boil, cover, then reduce the heat and let simmer 30 minutes. Remove the lid and stir, scraping up any rice that has started to stick to the bottom of the pot. Recover and continue to let simmer with the lid on until the rice is tender, 10 to 20 additional minutes, stirring the pot every 10 minutes or so to prevent sticking. If the rice begins to dry out, splash in the remaining 1/2 cup water as needed.
- Towards the end of the cooking time, place a rack in the upper third of the oven (about 6 inches from the top) and turn the oven to broil. Once the skillet is finished cooking on the stove, sprinkle the cheese on top, then transfer to the oven. Broil just until the cheese is melted, about 2 minutes (watch it carefully so it doesn’t burn). Serve hot with any desired toppings or spoon inside tortillas to make tacos, burritos, or quesadillas.
Notes
- If white rice or another type of rice is substituted, the cooking time will vary. Consult the package for guidance.
- TO STORE: Store the beef taco filling in an airtight storage container in the refrigerator for up to 3 days.
- TO REHEAT: Gently rewarm leftovers in a large ovenproof skillet in the oven at 350 degrees F until warmed through. You can also reheat this dish in the microwave.
- TO FREEZE: Place leftover filling in an airtight freezer-safe storage container in the freezer for up to 3 months. Let thaw overnight in the refrigerator before reheating.


Can you please list sodium numbers?
Hi Suzanne! Since sodium content can vary so much based on the brands of ingredients used, I recommend using an online calculator like MyFitnessPal, which you can customize based on the ingredients you have to get a more accurate number. I hope this helps and that you enjoy the recipe if you try it!
I tried your beef taco skillet and we really liked it, even my 2 and 3 year old did! Even though I didn’t have the peppers to put in, it was super! Thanks so much for all the wonderful recipes!
I’m so happy that you enjoyed the recipe, Faith! Thank you for sharing this kind review!
This will definitely be one of my favorites! I made a few substitutions because I did not have all the ingredients. Replaced the garlic powder with garlic salt and went a bit lighter on the kosher salt. Because I did not have enough Salsa, I used a 10 oz can of Ro Tel diced tomatoes with Serrano pepper then added in 6 oz of salsa. I also added a 3.8 oz can of sliced olives to cook with the meat mixture. We used stand and stuff taco shells and topped with a diced avocado, cilantro and lime juice mixture and shredded lettuce. This was plenty for the three of us, Hubby and Son LOVED it and we are enjoying the leftovers. Thank you Erin!
Gretchen, thank YOU for this lovely review. It’s incredibly helpful to others (and me!) and I am so so glad you all enjoyed it.
I have made this twice and both times it turned out perfectly, no modifications necessary. This is an excellent, more flavorful, and healthier alternative to basic beef tacos from a seasoning packet. Thanks so much for the recipe!
I’m so happy that you enjoyed it, Andrea! Thank you for sharing this kind review!
Can beans? Drained?
No mention of onion in the ingredients until the dish was being prepared.
Hi Lou! Yes, you should rinse and drain your beans first. Both the beans and the onion are listed in the ingredients section of the recipe card above. You can click the “Jump to Recipe” button at the top of the page, and it will take you right to it. I hope this helps!
Another delicious recipe from your site. Thanks Erin! I made it with farro instead of rice, and it worked perfectly. I had it for dinner with some roasted broccoli on the side, and it was a hearty, healthy, and simple meal. I used a jar of hot salsa, so the dish was quite spicy how I like it. I’ll definitely be making this again.
I’m so pleased that you enjoyed the recipe, Jenna! Thank you for sharing this kind review!
Hi Erin, I had a hard time with this recipe and I know it’s a “it’s not you it’s me” thing — every recipe I’ve ever made of yours has been excellent, so I’m hoping maybe you can help me figure out what went wrong. After using the full two cups of water and cooking the dish for the 40-50 minutes suggested in the recipe, my rice was still pretty much raw. I cooked it for an additional 45 minutes covered, and incrementally added another cup and a half of water, and at that point some of the rice was still barely al dente. The two things I can think of are the rice and the pot I used. The only brown rice I could find was simply labeled “whole grain brown rice”, but it looks like long grain rice and the cooking time on the package was 45 minutes, so I don’t think that was it. The pot I used was a 6 quart all in one pan (like a large braising dish or a deep skillet), and what I’m wondering is whether the pot was too large and shallow and if that somehow prevented the rice from properly cooking. Do you have any ideas? I know this dish has received very positive feedback from others, and I’m sure my family would love it (if the rice isn’t raw!). I do have a 12 inch ovenproof skillet (the same Staub you have in your photos), but I was worried it would overflow on the stove (I usually don’t like my pots filled too close to the top). Thank you so much for any advice you can offer!
Hi Cari, this is so odd! It is difficult for me to say without being there. My best guess is that perhaps the rice was not simmering as much as it should have been or that the rice needed more liquid at the beginning. The size of the pot sounds fine, as does the rice selection. Do you live at a high altitude? Water at high altitudes does boil at a lower temperature, so that could have contributed too. I’m sorry I can’t be of more help and that this didn’t turn out perfectly for you!
Hi Erin, thank you so much for the feedback — I don’t live at a high altitude, and I was pretty sure it the pan size, so I tried again using a 12 inch skillet. It definitely worked better, but I still had to cook it longer and add more water (although not nearly as much as I did the first time), but parts of the rice were still barely al dente. I’m going to try it again using a salsa that has more liquid and I might add the full two cups of water upfront, and see it any of that helps. I think this recipe definitely has potential for excellence if I can just figure out how to cook the rice — hopefully the third time will be the charm!
I have restaurant experience as well as have done plenty of cooking at home. I would say cooking rice with other ingredients can be tricky and hit or miss. Oftentimes the rice ends up al dente as you mentioned and more liquid is called for branding out the the recipe. One simple suggestion is to cook the rice separately as called for and then adding it in at the end of the cooking time. That’s always worked best for me.
I made this recipe for dinner tonight. It turned out wonderfully well. I deviated just a little, I didn’t have the salsa, so I used fresh tomatoes (cut up) and added some green chilies and more onions. I also divided the mixture onto 6 flour tortillas, topped with cheeses, and broiled in oven. The rice was cooked through, I did have to add another cup of water. Can you tell me where to purchase the skillet, name and size please. We are stuffed, and there are leftovers for another meal.
Carolyn, I am so so pleased to hear it! Thanks for sharing this kind review and your tweaks. It means a lot to me and is so helpful to others! This is the skillet I love and use for meals like this. It’s pricey but will last a lifetime; I’ve had mine for about 10 years and it’s still perfect. I also love and usually photograph with STAUB cast iron (the 10 inch is what you see in the photos here).
This was fantastic! Easy to make and cooked in the time listed in the recipe. Thanks!
Thank you for sharing this kind review, Lisa! I’m so happy that you enjoyed the recipe!
I was expecting this to be easy and tasty, and was actually shocked at how delicious it was. My whole family, including picky toddler loved it, and I’m so excited to add it to the rotation. I ran out of time and just made brown rice on the side by itself, and then added that in before broiling the cheese- still delish.
Hallie, I am SO SO excited to hear this, thank you!
Yummy! My whole family enjoyed this meal. I’m glad I used a Dutch oven. You were right. You really need to continue to scrape the bottom of the dutch oven to make sure the rice is cooked appropriately. It was well worth keeping a close eye on it and stirring every few minutes. Overall really delicious! We spiced ours up a bit more with jalapeño slices on top. Thanks sharing this recipe Erin!
I’m so happy that the recipe was a hit, Katie! Thank you for sharing this kind review!
Hi, I believe the rice is uncooked when adding but can you confirm?
Yes, confirmed Billie!
The recipe turned out really well.
So happy to hear it, thank you!
This was delicious and easy! Love one skillet meals, keep them coming. Only addition I made was a half teaspoon of paprika for the taco seasoning. Get rid of those taco seasoning packets and give this a try, you won’t be disappointed.
I’m so happy that you enjoyed it, Lauren! Thank you for sharing this kind review!
Absolutely loved this recipe! It was a family hit! I added corn for that extra crunch and it was really good. You should definitely try this!
Hi Haley! So glad you enjoyed the recipe! Thank you for this kind review!
This was so yummy! We all loved it! Even my picky eater kiddos! Had enough to have leftovers this week too! Thank you! :)
Hi Jenn! So glad you enjoyed the recipe! Thank you for this kind review!
Tried this recipe for the first time tonight and was super excited about it. But unfortunately, it didn’t turn out so well. The rice took forever to cook even though I followed the ingredients and instructions exactly. The hour turned to 2 hours and now the beef is over cooked. The taste was pretty good but the crunchy rice was not. Wanted to love this recipe but we won’t be trying it again.
I’m sorry to hear that these didn’t turn out as you hoped, Delaney. It’s so hard to say what might’ve happened without being in the kitchen with you. I (and many readers) have enjoyed this recipe, so I really wish they would’ve been a hit for you too!
Made this for my family on cinco de mayo and we all loved it!! Definitely will make again, the whole thing took less than an hour and a single pot recipe makes it so easy to clean up! I made the suggest skinny marg to go with it and it was delicious!
Hi Catherine! So glad you enjoyed the recipe! Thank you for this kind review!
Hi, can you tell me how many calories is 479kcal? And that’s for one serving right?
Hi Sarah, it’s 479 calories for one serving.
I also had issues with the rice cooking. The rice never got soft, and I cooked it for over 1.5 hours. If I make this again, I will cook the rice in my rice cooker and then add it. Good idea in theory.
I’m sorry to hear you had trouble with the recipe Courtney. I know it can be so disappointing to try a new recipe and it does not turn out for you. It has worked well for myself (and others) and I wished it would have been a hit for you too.
Very good but the brown rice took alot longer than the recipe said, but it was very good.
Sorry to hear you had trouble, PJ. Glad you still enjoyed it!
Any recommendations on if I don’t want to include salsa? I am not usually a fan of salsa in my tacos. Should I substitute it with something or leave it out entirely?
Hi Kat! Yes we had a substitute option in the recipe card, you can swap fire roasted diced tomatoes in their juices and add additional spices to taste. Enjoy!
We absolutely loved it!
Thank you Tony!
Missing ingredients that aren’t on the list, could be wrote better. Where did the onions come; or the water?
Hi A grandma, I’m sorry to hear you are having trouble navigating the recipe. I’m confused because I see all of the ingredients listed in the recipe card. The onions are the third ingredient on the list and in Step 1 of the directions. The water is the 14th ingredient on the list under the salsa and used in Step 3. Hope this helps!
It tastes amazing but the brown rice is taking forever to cook it’s been an hour already and still crunchy! I might try another type of rice.
I’m sorry to hear you had trouble with the rice, Duane. Hope you were still able to enjoy it!
We absolutely loved it!
Thank you Debora!
Made this last night. Delicious! My only negative comment is that the rice took a very long time to cook. I used brown basmati rice. Next time I may try white rice. Also, I mostly doubled up on the spices and I used a medium chunky salsa which gave the dish just a little bit of heat. All in all….a winner
Thanks for the feedback, Pat!
Sometimes when using brown rice, it helps to soak the rice in water before using it in the recipe. This will speed up the cooking of the rice. I usually soak my rice for about an hour and then include it in the recipe.
Thanks for the tip, Marie!
This was wonderfully easy and delicious. We are grateful for another solid meal to add into the rotation! Appreciate all you do to help us at-home-cooks make wholesome meals for our families.
So glad you enjoyed the dish, Hannah! Thank you!
SO SO DELICIOUS!! MY hubby and i will be eating leftovers tomorrow night!! I served it with corn taco shells and I used ground chicken instead of ground beef because we do not eat red meat and the fixings of cilantro, avocado, greek yogurt and lime wedges were the perfect compliment to this dish!! Can’t wait for the leftovers tomorrow!!
So glad to hear, Helene! Thank you!
My brown rice never got done. I would make it again as it was good but next time I would precook the rice some.
I also made mine with salsa verde as I am allergic to tomatoes. it was very good.
Thanks for the feedback, Marsha!
Hi Erin,
I’ve made many of your recipes as well, and have only had this issue once before, with the same bag of rice and the Stuffed Pepper Casserole, which cooks in a similar way! It’s a Great Value brand bag of rice, from Walmart. I usually have no issues when I buy store versions of staple items, but it could definitely be a bad bag and I do plan to get a new one.
The recipe did finally cook, after about 70 mins, with the rice still a bit al dente but definitely edible. But after you recommended time, it was definitely crunchy! The flavors are great so I definitely plan to try again with a new bag!
Thank you for taking the time to report back, Melanie! If you decide to try the recipe again with a new bag of rice, I’d love to hear how it goes!