


Learn how to cook a Thanksgiving turkey that’s perfectly moist and flavorful every time! After roasting turkeys for 15+ years and testing dozens of techniques, I’ve created this foolproof recipe that works in any home oven. Whether you’re cooking your first turkey or your 50th, this step-by-step guide covers everything: choosing the right size bird, proper thawing and brining, achieving golden crispy skin, ensuring juicy white and dark meat, accurate internal temperature checks so your turkey is juicy and fully cooked, and expert carving tips. This is the only Thanksgiving turkey recipe you’ll ever need!

5 Star Review
“I have been cooking turkey for 25 years. NEVER has it been as good as this year!! I followed this recipe to a tee…It. Was. AMAZING. So juicy and delicious!!!!”
— Jenn —
Why This Recipe Works

I’ve come a long way since cooking my first turkey for Friendsgiving at the age of 22.I’ve tested this method with birds ranging from 12 to 22 pounds, in ovens from 325°F to 450°F, and with every brine-versus-butter debate you can imagine. The result? This streamlined approach that delivers consistent results without fussy techniques. This recipe has fed my family, friends, and thousands of readers every November since 2010!
Temperature guidelines follow current safety recommendations for poultry.
Quick Links in this Article:

Thanksgiving Turkey Timeline: When To Do What
Start at least 24 hours ahead for a thawed turkey and up to 5 days ahead for a frozen turkey.
You can also download my FREE Ultimate Thanksgiving Playbook, which includes a full menu, grocery list, and exact timing for your entire Thanksgiving feast.
- 4 to 5 days before roasting. Thaw the turkey (about 24 hours per 4 to 5 pounds).
- 1 to 3 days before roasting. Brine the turkey. Use a dry brine (my favorite) 24 to 48 hours before, or a wet turkey brine 12 to 24 hours before.
- Day before/morning of. Uncover the brined turkey in the refrigerator to dry the skin. This step = crispy skin!
- 1 hour before roasting: Preheat the oven; let the turkey sit out at a cool room temperature (no more than 2 hours total for raw poultry); stuff the cavity, tuck the wings, and tie the legs; place on the rack in your roasting pan.
- Roast your Thanksgiving turkey (2 to 3 hours). Begin roasting at 450°F for 45 minutes, then reduce to 325°F until done. See How Long to Cook a Turkey for details. A 14- to 16-pound bird will need between 2 and 2 ½ hours total.
- Let rest (20 to 30 minutes). Tent with aluminum foil while the juices redistribute to help it retain heat.
- Make the gravy. Or heat up pre-made gravy. This Turkey Gravy recipe uses the drippings; this Mushroom Gravy can be made entirely in advance, no drippings required.
- Carve the turkey. See my turkey carving tutorial for step-by-step photos.
Now, let’s look at each step in detail.

1. Buy Your Turkey (How Big to Get)
Where to buy: Whenever possible, I prefer to purchase a fresh Thanksgiving turkey from a local butcher, because the flavor is richer and you don’t have to fuss with multi-day thawing (not to mention your purchase supports local farmers and businesses).
That said, frozen turkeys are 100% fine and usually less expensive. Just be sure you plan your thaw time accordingly. They typically start showing up in local grocery stores as early as mid-October.
What size to buy: Plan on 1 1/2 pounds per person, or 2 pounds per person if you have big eaters and/or want leftovers. See How Much Turkey Per Person for more.
- For 6 to 8 people: get a 10-12 pound turkey
- For 9 to 12 people: get a 14-18 pound turkey
- For 12 to 16 people: get an 18-24 pound turkey
Self-basting (“pre-brined”) turkeys: This is what many grocery stores carry. They are injected with a salt solution to help them stay moist. If using, I still recommend brining but reduce the amount of salt.
Small crowd at Thanksgiving? Cooking a turkey less than 10 pounds isn’t usually worth it, because you’re paying for more bones than meat. Instead, check out my Air Fryer Turkey Breast or Crockpot Turkey Breast.

2. Thaw Your Turkey (Safely!)
If you purchase a frozen turkey, thaw it in the refrigerator. Plan on 24 hours per 4 to 5 pounds of turkey. You want it to be thawed by the time you are ready to brine.
In a hurry? Use the cold water method. Keep the turkey sealed, submerge it breast-side down in cold water, and change the water every 30 minutes to keep it below 40°F. Budget about 30 minutes per pound and cook immediately after thawing. Do not thaw turkey on the counter.
You cannot roast a frozen (or partially frozen) turkey. The outside meat, especially the breast meat, will be very dry by the time the inside is cooked to 165°F.
3. Brine Your Turkey (The Secret to Juicy Meat!)
After years of Thanksgiving cooking, I can tell you the one thing that makes the biggest difference: brining. I’ve experimented with skipping it (spoiler: not worth it), and every single time, the brined bird wins by a landslide.
Why brining works: Salt changes the protein structure so that the meat absorbs and holds onto moisture during roasting. It also seasons the turkey all the way through, not just on the surface.
You have two brine options:
- Wet Brine. Turkey is soaked in a seasoned saltwater solution for 12 to 24 hours, then the solution is rinsed away.
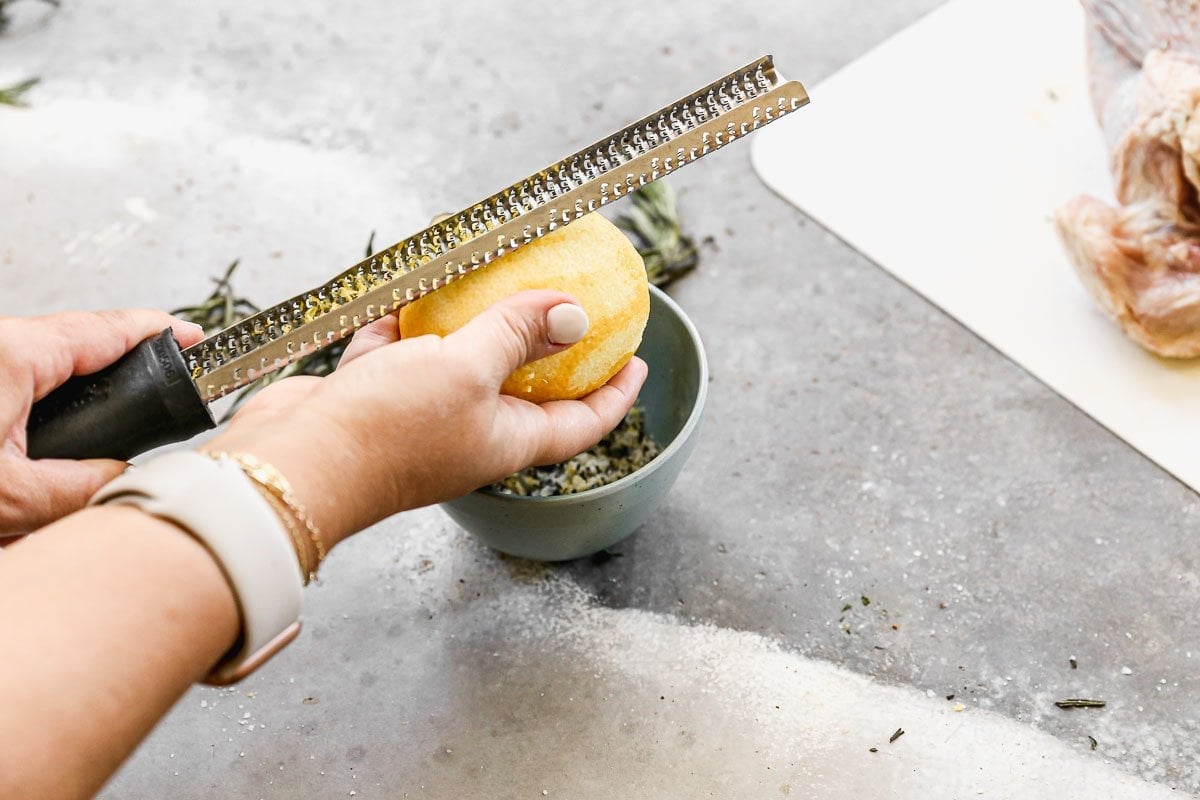
- Dry Brine (my preferred method). A mixture of salt and seasonings, such as herbs and lemon zest, is rubbed on the turkey and allowed to sit for 24 to 48 hours. No rinsing is needed.
I’ve also tested roasting Thanksgiving turkey without brining it (I used lots of garlic herb butter instead) and while it was fine, you simply cannot create turkey that is moist throughout (including moist white meat) unless you brine it first.
There are two exceptions to the brining rule.
- If you have a kosher turkey you do not need to brine it. These are well-seasoned already and further brining can make them too salty.
- If you have a turkey that is injected with a brining solution, also called “self-basting” (most grocery store/budget-brand turkeys are), brining can still improve your results—just cut back on the salt and use the shorter end of the brine time. I prefer a dry brine for pre-injected turkeys because it’s less intense than a wet brine.

4. Dry Out the Skin for Crispy, Golden Skin
Uncover the brined turkey in the refrigerator the day before or even several hours before roasting to air-dry the skin and help it roast up deeply golden and shatteringly crisp.
- If you are using a wet brine, you will need to rinse off the brine first or the turkey will be too salty.
- If using a dry brine, you do not need to rinse it off.

5. Stuff the Cavity
To season and perfume your bird from the inside out, fill the cavity with a variety of herbs and aromatics.
- Onion and/or Garlic. Split the garlic in half and cut the onion into wedges. No need to peel either, as they will be discarded.
- Apple Slices. They give the turkey fall fruitiness (no need to peel or core).
- Carrots. For an extra dimension of natural sweetness.
- Herbs. Add several sprigs of fresh thyme, sage, and/or rosemary (often sold together in grocery stores as “poultry blend”).

6. Tuck the Wings and Tie the Legs
To tuck the wings: Pull the wings out, then bend and tuck them underneath the neck end so they do not burn (see photos above).

To tie the legs: Use kitchen twine (or if you don’t have any, a rope of aluminum foil) to snugly tie its legs together so the turkey roasts more evenly.
7. Fill the Roasting Pan
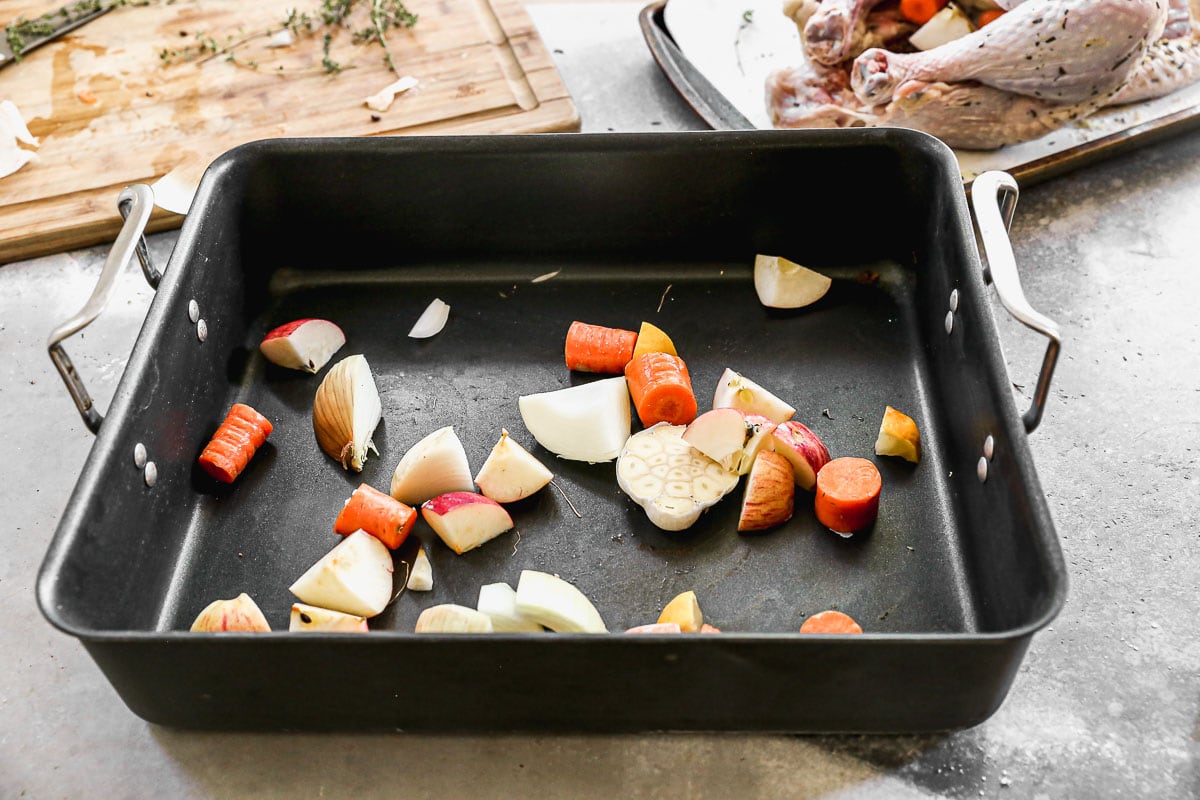
To flavor your turkey even more, scatter any extra aromatics that don’t fit in the cavity in the bottom of a large roasting pan. They’ll mix with the drippings to create fabulous pan juices.
- The best roasting pan for turkey is at least 16 inches long and 4 inches deep, with big sturdy handles so it’s easy to lift (this is a good option).
- If you will be roasting a turkey that is 20 pounds or more, purchase a roasting pan that is at least 18 inches.
- If you don’t own a big roasting pan, purchase a disposable aluminum roasting pan from the grocery store.

8. Place a Rack in the Pan, then the Turkey on the Rack
Using a rack elevates the turkey off of the surface of the pan so the air can more evenly circulate.
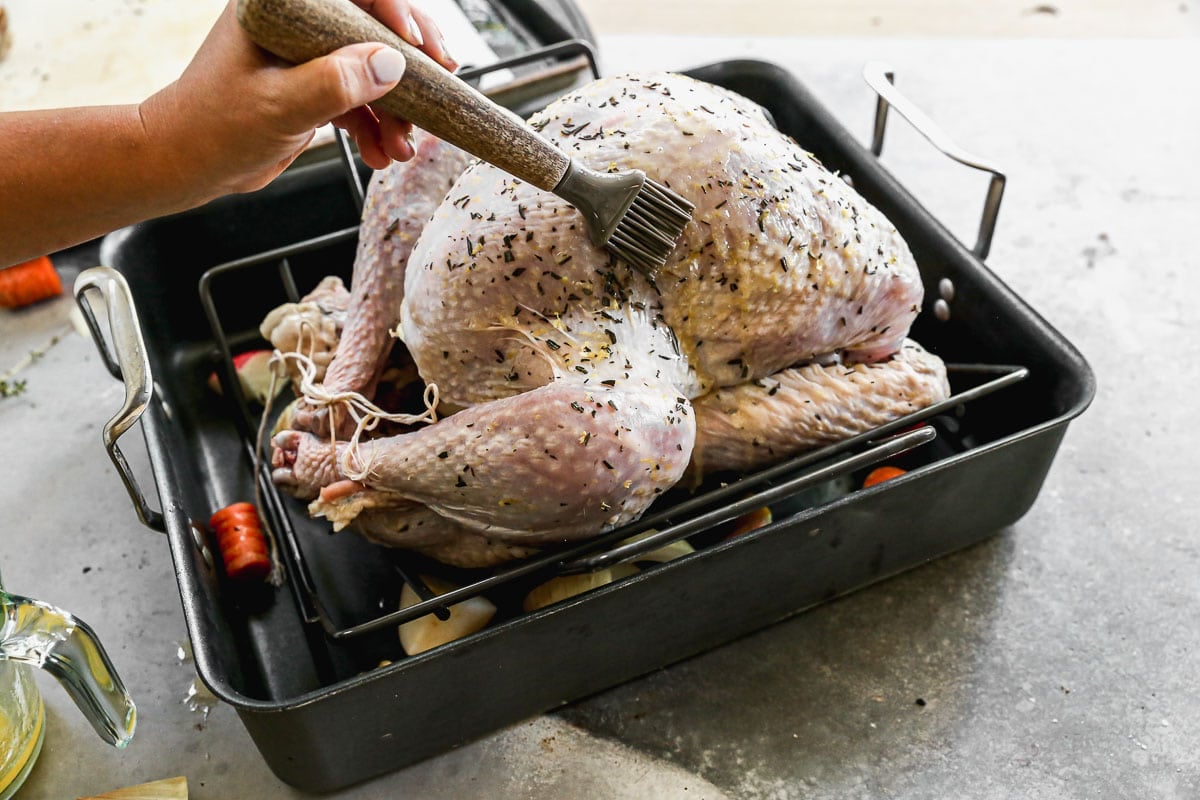
9. Butter the Outside
Brush the outsides of the turkey liberally with melted butter and season with pepper for golden, flavorful skin.

10. Add Liquid to the Pan (+ My Family’s Secret Tip for Moist Turkey!)
I learned this trick from my stepdad, Larry, who cooks the best turkey I’ve ever eaten: Set the roasting pan with the turkey on the oven rack, then carefully pour in a full bottle of dry white wine (like Sauvignon Blanc or Pinot Grigio).
The wine steams the turkey from below, keeps the meat moist, and gives you incredibly flavorful juices for serving.
If you don’t cook with alcohol, use 4 cups low-sodium chicken or turkey stock instead. You’ll still get beautifully moist meat and flavorful pan juices.

11. Roast the Turkey: High, Then Low
The best way to cook turkey in the oven is to start it at a high temperature to crisp the skin, then reduce the temperature until the turkey is succulently juicy.
Start at 450°F for 45 Minutes
Starting the turkey at a high temperature jump starts browning to give you crispier skin
Then Reduce to 325°F to Finish
325°F is the best temperature for roasting turkey.
- Any higher for a prolonged period and the delicate white meat will cook too quickly.
- Any lower, and some of the juices can slowly dry out (and it will take much longer).
325°F is the sweet spot for cooking turkey!

12. Check Your Turkey for Doneness
Turkey is safe to eat when all parts of the bird reach 165°F. Insert the thermometer into:
- The thickest part of the breast
- The thickest part of the thigh (without touching the bone)
- The wing joint
- The stuffing (if applicable)
Make sure you are not poking through the skin all the way into the turkey cavity and do not use the pop out thermometers that come with some turkeys; they are not very accurate.
My pro tip for the juiciest meat: I personally take the turkey out of the oven when the breast reaches ~155°F and the thigh is ~160° to 170°F. Then I tent the turkey and let it rest 20 to 30 minutes. During the rest, the internal temperature continues to rise to a minimum of 165°F.
Thanksgiving Turkey Cook Time Per Pound
Repeat after me, “I will not overcook the turkey.”
- The rule of thumb is 10 to 12 minutes per pound at 325°F.
- For my method (450°F for 45 minutes to crisp the skin, then 325°F for the remainder), a 14- to 16-pound turkey takes 2 to 2 ½ hours to roast.
- Start checking earlier than you think. You can always keep roasting but once you go overcook, that moisture is gone.
For my full chart of cooking times by weight, see How Long to Cook a Turkey.
Need your turkey faster? Make Spatchcock Turkey!

13. Let the Turkey Rest (Don’t Skip!)
Rest your turkey for a minimum of 20 minutes.
- When you rest turkey, the juices reincorporate into the meat.
- If you cut right away, all of those beautiful juices will run away onto your cutting board.
I prefer to tent my turkey with foil while it rests (the skin still stays crispy, even covered), but if your turkey is overcooked, you may want to leave it uncovered. It will still stay plenty hot.
14. Make the Gravy
While the turkey rests is the perfect time to make gravy.
- If you’re making Turkey Gravy with drippings, separate the fat first (I use a fat separator).
- You can also make gravy 100% in advance and just reheat it on the stove.
If gravy stresses you out, don’t panic. Your pan juices (especially with the wine trick) are so flavorful, you can skip the gravy, spoon the juices right over the carved turkey, and call it a day.

15. Carve Your Thanksgiving Turkey
For a complete step-by-step, see How to Carve a Turkey.
- If possible, use a great big cutting board with grooves like this.
- Even after the turkey rests, it will still be super juicy, so the grooves help.
- Eventually, I invested in an electric knife because it makes carving speedier, but a sharp chef’s knife will do the job.
16. DIVE INTO YOUR MOIST TURKEY!
Bask in the glory.
You cooked a MOIST Thanksgiving turkey that your friends and family will rave about for years to come!

Thanksgiving Turkey Tips and Troubleshooting
- Any Brining is Better Than No Brining. Even a few hours is better than skipping brining altogether.
- If You are Short on Time, Use a Wet Brine. Wet brining works faster than dry brining, so if you are short on time (have 12 hours or less), do a wet brine.
- If You Forgot to Brine. Salt and pepper the outside of the turkey GENEROUSLY (including inside the cavity). Mash a stick of softened butter together with chopped fresh herbs, lemon zest, garlic, and salt and rub the garlic butter under the turkey skin. Brush the turkey with more melted butter prior to roasting.
- Cook the Stuffing Outside of the Bird. I know some like cooking stuffing inside the cavity, but it can be a hazard because the stuffing also has to reach 165°F, and if it’s not there yet, you’ll overcook the turkey (plus there is never enough to go around!). Make a pan of Cornbread Stuffing instead (technically if the stuffing is cooked outside of the bird it is called dressing, but by any name, it’s delish!).
- Don’t Bother Basting. Opening the oven over and over drops the temperature and slows cooking, and most of the liquid just rolls off the skin instead of soaking in. Pouring wine or stock in the roasting pan at the start will keep things moist without constant basting.
- Shield the Turkey Breast. About 1 hour into roasting, shield the breast only with aluminum foil. This will help protect the white meat and keep it moist.
- Don’t Cover the Turkey Completely. You want that skin to crisp, so it needs to be exposed to heat.
- DO NOT OVERCOOK THE TURKEY. The magic number is 165°F. Since the temperature continues to rise during resting, I personally remove mine a little early and it comes to 165°F before carving.
- Use an Instant Read Digital Thermometer. Do not use the pop-up kind (these are inaccurate). This one is inexpensive and does the job; this one is my absolute favorite and well worth the investment.
- Skip the Gravy. Not in the mood? You don’t have to make gravy! Follow this recipe and your turkey will be so moist, you won’t need it. Spoon the juices from the roasting pan onto your meat instead.

Turkey Tools
- Instant Read Thermometer. I can’t say this enough! Critical to make sure you roast your turkey to a safe temperature without overcooking it.
- Roasting Pan. It’s essential that you have something large enough and (ideally) sturdy enough to support your turkey. Purchase one with a rack.
- Electric Knife. Makes carving the turkey so much easier. I finally caved and bought this and am SO GLAD I did.
- Fat Separator. Make separating the drippings for gravy easy with this handy tool.
- Grooved Cutting/Carving Board. The grooves are essential to trap juices so they don’t run all over your counter (and floor).
Wine Pairing
Roast turkey will pair well with Pinot Noir, Zinfandel, Sangiovese, Chardonnay, dry Riesling, or Champagne. If possible, provide your guests with a couple of options.

Thanksgiving Sides to Serve with Your Turkey
Complete your Thanksgiving spread with a collection of fabulous side dishes. Here’s 40+ Thanksgiving Side Dishes (they’re also great alongside Crockpot Ham if you’re serving a turkey alternative). A few favorites:
- Mashed Potatoes. The Best Classic Mashed Potatoes Recipe is our go-to. Check out Garlic Mashed Potatoes, Crockpot Mashed Potatoes, and Instant Pot Mashed Potatoes too.
- Sweet Potatoes. Sweet Potato Casserole, Glazed Sweet Potatoes, and Sweet Potato Souffle.
- Scalloped Potatoes. Cheesy Scalloped Potatoes or Crockpot Scalloped Potatoes.
- Cranberry Sauce. A classic part of a Thanksgiving spread! Try my Cranberry Orange Sauce or Cranberry Orange Relish.
- Brussels Sprouts. Serve these fan-favorite Maple Bacon Brussels Sprouts or Brussels Sprouts Casserole.
- Green Beans. A total classic! Try my favorite Green Bean Casserole or Roasted Green Beans.
- Salad. Everyone will make room on their plates for Winter Salad or Apple Walnut Salad.
- Stuffing (er, Dressing). Keep the oven free for your turkey by making this Crockpot Stuffing. Chestnut Stuffing is another favorite.
- Dessert! From Sweet Potato Pie, to Bourbon Pecan Pie, to Buttermilk Pie, you can’t go wrong.
Leftover Ideas
For leftover turkey recipes everyone will actually WANT to eat, check out my extensive list of Leftover Turkey Recipes.
Store leftovers in your refrigerator for up to 4 days, and refrigerate the turkey within 2 hours of carving. Reheat to 165°F.
Frequently Asked Questions
If your turkey hasn’t thawed completely, you can do a flash thaw to thaw it safely: Submerge your packaged turkey in an ice water bath (your sink, a large bucket, or even a cooler will work), changing the water every 30 minutes and ensuring it stays below 40°F. This method will still take a while (about 8 hours for a 15-pound turkey), but it will be much faster than the times listed above and result in tender meat. Cook immediately after thawing.
If your turkey is just a little bit frozen and you are doing a wet brine, you can place it in the brine while it is still partially frozen; the brine will help it thaw. You also can dry brine turkey if it’s slightly frozen (it won’t thaw as quickly as wet brine turkey). In either case, be sure your turkey is completely thawed when it’s time to roast.
Both have their pros and cons. A dry brine produces crispier skin, but it doesn’t work as quickly or add *as* much moisture. A wet brine helps make the meat ultra moist and works quickly, but it can be quite messy.
No, you do not need to rinse your turkey, unless you are rinsing off a wet brine. Otherwise, don’t rinse: it doesn’t make the turkey safer or tastier, and it can splash raw turkey juices around your sink and counter.
I recommend cooking a turkey uncovered to start. This allows the skin to crisp up. I do like to tent my turkey breast with aluminum foil after about 1 hour to deter overcooking to protect the delicate white meat.
There is no need to use a turkey bag for your roasted turkey. Using a bag won’t allow the skin to get as crispy, so I prefer making my turkey without one.
I am team butter, because it has the best flavor and turns a beautiful golden color. Some argue that because the butter’s milk solids can burn, it is better to use oil, but I have not had any issues with an off taste in my turkey, even when I start it at a high temperature. If you’d like to be 100% safe (and go above and beyond), you can brush your turkey with clarified butter, which is butter with the milk solids removed.
For the nicest, most classic presentation and maximum crispy skin, roast the turkey breast side up. Some like to roast turkey breast side down, because the breast meat stays more insulated. If you decide to try it, do not attempt to flip the turkey over partway through roasting; it’s risky because the bird is so hot. Just embrace the odd appearance.
Now you have it: Everything you need to know to cook moist turkey in the oven that will have your guests gushing, FOOLPROOF, without the stress.
HAPPY HOLIDAYS! If you try this roast turkey recipe, I’d love to hear how it goes!

Thanksgiving Turkey
Video
Email Me the Recipe!
From time to time, we’ll send you Well Plated emails. You can unsubscribe anytime. Have an account? Log In.
Ingredients
- 1 14- to 16-pound turkey THAWED (see notes for other bird sizes, thawing, and be sure to plan ahead!!)
- 1 brine Dry Brine Turkey or wet Turkey Brine recipe (I use dry 99% of the time)
- 3 medium carrots scrubbed
- 2 red apples
- 1 large yellow onion
- 1 lemon
- 1 head garlic
- 8 sprigs fresh thyme
- 4 tablespoons (1/2 stick) unsalted butter melted
- Freshly ground black pepper
- 1 bottle of dry white wine such as Sauvignon Blanc or Pinot Grigio
Instructions
- 1 to 3 days Before Roasting: Remove the neck and giblets from the turkey and discard or save for gravy. Brine the turkey, using either a wet brine or a dry brine (wet brine goal is 12 to 24 hours; dry brine goal is 24 to 48 hours; ANY brining is better than none).**
- 24 Hours Before or the Morning of Roasting – Let the Skin Dry Out: For a wet brine – Remove the turkey from the brine and rinse thoroughly. Pat very dry with paper towels, then place on a rimmed baking sheet or shallow pan to catch any drips. Place in the refrigerator, uncovered. For a dry brine – Uncover the turkey (it will already be on a baking sheet) and return to the refrigerator. For both methods – Let the turkey sit uncovered in the fridge until you are ready to roast—a few hours if you uncovered it that morning, or for up to 24 hours. This step dries the skin, which is important in order for it to crisp. The skin will turn somewhat translucent as it sits.
- 1 Hour Before Roasting – Let Come to Room Temperature – Remove the turkey from the refrigerator and let stand at room temperature. Now is a good time to make sure you removed the plastic attachment from the legs.
- 30 Minutes Before Roasting – Preheat the Oven to 450°F – Place the rack in the lowest position and move or remove any other racks that are going to get in the turkey's way. Preheat to 450°F. Let it preheat for a good 20 to 30 minutes to make sure it's screamin' hot.
- Chop the Aromatics – If the carrots are large, cut them in half lengthwise, then chop into 1-inch pieces. Cut the apples, onion, and lemon into eights (no need to peel anything or to core the apple). Cut the head of garlic in half crosswise (that's horizontally through the cloves), then break each half into 4 big pieces (no need to peel).

- Stuff the Cavity – Stuff the turkey cavity with all of the thyme and about half each of the carrots, apples, onion, lemon, and garlic. Scatter the remaining carrots, apple, onion, lemon, and garlic in the bottom of a very large roasting pan.
- Tie, Butter, and Pepper – Tuck the turkey's wings underneath its body by stretching them up and tucking them under the turkey's body (as if the turkey were stretching its wings up and behind its neck). With kitchen twine or (in a pinch) a rope of aluminum foil, tie the legs snugly together. Place a rack in the roasting pan (see blog post above to make your own rack using foil), then lift the turkey onto the rack. Brush the turkey all over with the melted butter. Sprinkle with black pepper.
- Add the Wine + Roast at a High Temperature for 45 minutes – Place the turkey on the lowest oven rack. Carefully pour the wine into the roasting pan, leaving at least 2 inches of open space at the top of the pan (if you're using a large pan, the whole bottle should fit). Roast the turkey at 450°F for 45 minutes.
- Reduce the Oven Temperature to 325°F – If you have an oven-safe thermometer, insert it into the thickest part of the thigh without touching the bone (a digital thermometer with an alarm is ideal; a standard meat thermometer works too).
- Continue Roasting at 325°F and Check for Doneness – Roast 1 to 1 1/2 hours more (a 14- to 16-pound turkey typically needs about 2 to 2 1/2 hours total), or until the thickest part of the breast, thigh, and wing joint all reach 165°F on an instant-read thermometer. This is the safe temperature for turkey.My tip for extra juicy meat – I personally take the turkey out a little earlier—when the breast reads around 155° to 160°F and the thigh is around 160° to 170°F—then I tent it with foil and let it rest 20 to 30 minutes. The temperature will continue to rise as it rests and reach 165°F.Prevent Overbrowning – If the breast starts to get too dark or is progressing much more quickly than the thigh, tent the breast only with foil (I fold foil into a triangle with the point facing the legs). Check early to be safe, and see How Long to Cook a Turkey for more information.
- Let Rest – Transfer the turkey to a cutting board. Cover and let rest for at least 20 to 30 minutes. If you are making Turkey Gravy, do it now—the turkey will be so juicy, it's not strictly necessary for the meat.
- Carve, Serve, Bask in the Glory – Carve the turkey and serve with the pan juices and/or gravy. Listen to your friends oohhh and ahhhh. YOU DID IT!


Notes
- TURKEY THAW TIMES: For every 5 pounds of turkey, plan on 24 hours thawing in the refrigerator (that’s 3 days thawing for a 15-pound bird). For faster thawing, place the turkey in a cold water bath and change the water every 30 minutes. This will still take about 8 hours for a 15-pound turkey. Because it’s hard to have a turkey hogging the refrigerator for such an extended period, I prefer to purchase turkey fresh from a local butcher or the farmer’s market (check with your grocery’s meat department too; they may be able to order or thaw one ahead for you). You also can thaw turkey in a cooler, provided it is kept below 40° F.
- BE FLEXIBLE. A LOT will affect your turkey cooking times (including if you open the oven a lot towards the end to check the turkey’s temperature, which is understandable). Give yourself grace and a buffer in case the time goes over.
- IF YOUR TURKEY IS LARGER OR SMALLER THAN 14 to 16 POUNDS: Plan on 10 to 12 minutes per pound when roasting at 325°F. Since this turkey starts at a higher temperature, I recommend subtracting 15 minutes for every pound less than 14 pounds (so if your turkey is 13 pounds, check 15 minutes early; if it’s 12 pounds check 30 minutes early, etc). and adding 10 minutes for every pound (if your turkey is 17 pounds, plan on 2 hours, 10 minutes to 2 hours 40 minutes, if it’s 18 pounds, 2 hours 20 minutes to 2 hours 50 minutes, etc.). Turkey times are not 100% predictable no matter how many times you’ve made them, so have some snacks and drinks on hand, hang with guests, and enjoy the process.
- SHOULD I DO A WET OR DRY BRINE? **I have done both brining methods and am partial to the dry brine for the ease. The wet brine produces a turkey that is a *little* juicier and plumper but both methods make excellent, juicy turkey.
- TO STORE: Refrigerate turkey within 2 hours of carving in an airtight storage container or ziptop bag for up to 4 days. To keep the meat moist, drizzle a little of the turkey drippings or broth over the top before refrigerating it.
- TO REHEAT: Wrap the turkey in an aluminum foil pouch, sealing it at the edges. Drizzle turkey drippings or broth over the meat before sealing. Warm the pouch in a baking dish in a 300°F oven.
- TO FREEZE: Freeze turkey in an airtight, freezer-safe storage container for up to 3 months. Let thaw overnight in the refrigerator before reheating.
- The nutrition information is based on the turkey meat and butter.


This was my first turkey, and it turned out beautifully!!! We absolutely loved it, and it was so easy. A definite Thanksgiving staple for us.
Yay! Makes me so happy to hear!
I used this recipe when hosting for the first time and it made the bird manageable. I brined it using your dry brine recipe. The instructions were clear and I didn’t feel totally stressed. Thank you so much!
So glad to hear, Atasha! Thank you!
My oven was going kabooey so my 16lb turkey took about 6 hours to cook. But it was fat and juicy! My son, who doesn’t really like turkey, ate 2 large pieces and requested i cook turkey for Christmas. That’s how I know this is a keeper. Btw- i used the dry brine.
Makes me so happy to hear it was a hit! Thank you!