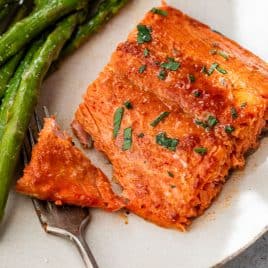
Peruvian Chicken is crispy-skinned and sensationally flavored with a verdant, vibrant combination of lime, garlic, oil, and warm spices. It’s roasted in the oven, then served with a lively, creamy green sauce, and as soon as you finish it, you’ll want to make it again!

Why You’ll Love This Peruvian Chicken Recipe
- Incredibly, Unforgettably Flavorful. The best way that I can describe Peruvian chicken is a spectacular yin and yang between the bracing brightness of the lime and the sultry savoriness of the garlic and cumin. It’s special because of its unique sour and spiced taste that’s invigorating and comforting at the same time. And that aji amarillo sauce? It’s BOSS.
- Easy to Make at Home. Peruvian chicken, or Pollo a la Brasa, is traditionally made with a whole chicken cut into parts, but for easy home cooking, I prefer to use bone-in chicken thighs and breasts. Perfect for a weeknight!
- A Multi-Purpose Marinade. The spiced garlic-lime Peruvian chicken marinade is a fresh alternative to classic Chicken Marinades. You can use it anytime you are making Baked Chicken Thighs or Baked Bone-In Chicken Breasts.

5 Star Review
“This recipe is packed full of flavor. All four of my kids and I loved it!! The sauce is fantastic. I will absolutely be making this again.”
— Angela —
What Is Peruvian Chicken?
Peruvian chicken—a dish popular throughout Peru—involves whole chicken parts that are marinated, then grilled or roasted.
It’s usually served with rice or Oven Roasted Potatoes and a condiment called aji verde.
The sauce (aji verde) is creamy with an herby punch from cilantro and grassy heat from chile peppers.
Between the juicy, moist meat, crispy skin, and the spirited sauce, it’s hard to pick a favorite part!

How to Make Peruvian Chicken
The Ingredients
- Chicken. Protein-rich, bone-in, skin-on chicken thighs and breasts become tantalizingly flavorful and juicy after being marinated. Thanks to our high heat roasting and broiling method, the skin gets perfectly crispy!
- Lime Juice. The lime juice adds zip, acidity, and helps tenderize the chicken.
- Garlic. For delicious garlicky flavor to complement the more sweet and sour elements.
- Spices. The chicken marinade contains salt, pepper, cumin, chili powder, paprika, and oregano. The mixture is earthy, spicy, sweet, and savory.
- Sriracha. For a little heat.
- Vinegar. Vinegar helps break down the chicken, allowing it to easily soak up the marinade.
- Honey. Adds a touch of natural sweetness to the chicken marinade.
- Green Sauce. The delightfully zippy, herby, creamy, and sweet sauce pairs flawlessly with the chicken. The sauce is made of jalapeños, cilantro leaves, garlic, yogurt (or mayo if you need it dairy free), olive oil, lime juice, vinegar, salt, and honey.
The Directions

- Make the Chicken Marinade. Blend the marinade ingredients together until smooth.

- Prep the Chicken. Pat the chicken dry.

- Season. Sprinkle the chicken with salt and pepper. Spread half of the marinade under the chicken skin.

- Marinate. Add the chicken to the remaining marinade. Cover and marinate in the refrigerator for at least 4 hours.

- Combine. Make the green sauce: Blend the cilantro and jalapeño.

- Blend. Add the remaining sauce ingredients, blending until smooth. Let the chicken stand at room temperature prior to cooking.

- Cook. Bake Peruvian chicken for 15 minutes at 425 degrees F. Reduce the temperature to 375 degrees F and cook for 15 minutes more.

- Finish. Broil for 1 to 2 minutes to crisp the skin. Let the chicken cool, then serve it with the green sauce. ENJOY!

Grilled Peruvian Chicken
If you’d prefer to make your chicken on the grill, you can certainly do so!
- Prepare the recipe as directed through step 6.
- Turn your grill to high heat. Just before adding the chicken pieces, reduce the grill to medium heat.
- Add the chicken pieces, shaking off any excess marinade. Cook for 10 to 12 minutes, then flip the pieces over.
- Cook for an additional 10 to 13 minutes, until all the pieces are cooked through.
If any of the chicken pieces reach 165 degrees F early, set them aside on a baking sheet and tent with foil. (See my Grilled Chicken Breast and Grilled Chicken Thighs for more chicken grilling tips.)
Storage Tips
- To Store. Refrigerate leftover Peruvian chicken and sauce separately in airtight storage containers for up to 3 days.
- To Reheat. Rewarm chicken on a baking sheet in the oven at 350 degrees F or in the microwave—note that the skin will be less crispy if microwaving.
- To Freeze. Freeze chicken in an airtight, freezer-safe storage container for up to 3 months. Let thaw overnight in the refrigerator before reheating. Prepare a fresh batch of the sauce.
Meal Prep Tip
Up to 1 day in advance, prepare the green sauce as directed. Cover and refrigerate it until you’re ready to finish the recipe.
Leftover Ideas
Shred leftover chicken and serve it over a bed of lettuce or cooked, cooled quinoa with the green sauce for a simple, delicious salad. Add your favorite mix-ins like cucumbers, tomatoes, or avocado.
What to Serve with Peruvian Chicken
- Rice. This Peruvian-style roast chicken would pair perfectly with Instant Pot Brown Rice, or use this easy guide for How to Cook Brown Rice on the stovetop.
- Potatoes. Grilled Potatoes or Air Fryer Potato Wedges would be scrumptious with this chicken.
- Salad. For a fresh pairing, serve this chicken with Cucumber Tomato Avocado Salad.
- Vegetables. Enjoy your chicken with a side of Grilled Corn or Air Fryer Green Beans.

Recommended Tools to Make this Recipe
- Baking Sheet. No need for a roasting pan, these baking sheets will work perfectly for this recipe.
- Blender. This is the high-speed blender I own and love. This more economical option will also work well.
- Instant Read Thermometer. The best way to know when your chicken pieces are cooked through.
Recipe Tips and Tricks
- Don’t Over- or Under-Marinate. For the best results, marinate the chicken for at least 4 hours. This will give the signature marinade time to tenderize and fully flavor the meat. I do not recommend marinating Peruvian chicken for more than 8 hours. The concentration of lime juice in the marinade can cause the meat to start to break down.
- Judge By Temperature, Not the Clock. Instead of setting a timer and declaring your roasted Peruvian chicken done when it goes off, check the temperature of the chicken. This is the only fail-proof way to know when your chicken is done. While you can put it back in the oven if it’s under-baked, there’s no going back if you over-cook it. This is why temperature is key!
- Some Chicken Will Be Done Before Others. Another reason to use that meat thermometer! You can expect that the different pieces of chicken will be done at different times. When one piece is done, remove it from the pan and tent it with foil while the rest finish cooking. Keep roasting and removing chicken as needed.


Peruvian Chicken
Video
Email Me the Recipe!
From time to time, we’ll send you Well Plated emails. You can unsubscribe anytime. Have an account? Log In.
Ingredients
For The Chicken:
- ¼ cup extra-virgin olive oil
- 2 tablespoons lime juice about 1 medium lime
- 6 garlic cloves roughly chopped
- 1 tablespoon kosher salt divided
- ½ teaspoon ground black pepper
- 2 teaspoons ground cumin
- ½ teaspoon chili powder
- 2 teaspoons paprika
- 1 teaspoon dried oregano
- 1 ½ teaspoons sriracha or Sambal
- 1 tablespoon white vinegar
- ½ teaspoon honey
- 4 pounds bone-in, skin-on chicken thighs and breasts about 4 thighs and 1 split chicken breast*
For the Green Sauce:
- 3 roughly chopped jalapeño peppers about 7 oz (see notes below for spice levels including varying amounts of seeds)**
- 1 cup packed cilantro 1 ounce
- 2 cloves garlic roughly chopped
- ¼ cup whole milk plain Greek yogurt use mayo to make dairy free
- ¼ cup extra-virgin olive oil
- 2 tablespoons lime juice about 1 medium lime
- 1 teaspoon white vinegar
- 1 ½ teaspoons kosher salt
- 1 teaspoon honey
Instructions
- For the chicken marinade: In a mini food processor or high-speed blender, blend the olive oil, lime juice, garlic, 1 1/2 teaspoons of the salt, 1/4 teaspoon of the black pepper, cumin, chili powder, paprika, oregano, honey, sriracha, and white vinegar until mostly smooth.

- With paper towels, pat the chicken very dry on both sides. If using a whole chicken breast (which looks like a heart shape), see notes below to split it in half.
- Sprinkle the chicken pieces all over (on the top and bottom of each piece) with the remaining 1 1/2 teaspoons salt and 1/4 teaspoon black pepper. With your fingers or a spoon, gently loosen the chicken skin from the flesh. Spread half of the marinade underneath the skin of the chicken pieces.
- Place the chicken pieces and remaining marinade into a ziptop bag or large bowl and mix around to fully coat. Cover and marinate the chicken in the refrigerator for at least 4 hours or up to 8 hours (you can push the marinade to 12 hours, but at your own risk—the meat may start to break down somewhat because of the lime juice).
- Make the Green Sauce: Add the jalapeño and cilantro to a blender (a regular blender or high speed will both work; you can also use a mini food processor, but the sauce will not be *as* smooth). Blend in long pulses until chopped.
- Add the remaining sauce ingredients (garlic, yogurt, oil, lime juice, vinegar, salt, and honey) and blend for about 2 minutes, until smooth. Cover and refrigerate until ready to serve. (The sauce is excellent served right away but the flavor will intensify and the sauce will thicken a bit if it sits in the fridge overnight.)
- When ready to cook the chicken, place the oven racks in the upper third and center of your oven, and preheat the oven to 425°F. Let the chicken stand at room temperature for 15 minutes prior to cooking.
- Using tongs, remove the chicken from the marinade (no need to wipe it off) and place it onto a rimmed baking sheet, skin side facing up. Discard any excess marinade left in the bag/bowl.
- Bake the chicken on the center rack for 15 minutes. Reduce the oven temperature to 375°F and bake for an additional 15 minutes until the chicken is cooked through. It should register 160 to 165°F on an instant-read thermometer inserted at the thickest part (the FDA directions to cook to 165°F; I prefer to remove my chicken a few degrees early, as its temperature will rise as it rests). If any pieces finish early, remove them to a plate and tent with foil while you continue baking the rest.
- Turn the oven to broil. Return any chicken you pulled off early to the pan. Transfer the pan to the upper third of the oven and broil for 1 to 2 minutes, until the skin is golden and crispy. Keep a close eye on the chicken to make sure it does not burn. Don’t walk away!
- Remove the pan from the oven, and allow the chicken to cool for 10 minutes. Serve with the green sauce.


Notes
- Authentic Peruvian Chicken: Use the same amounts of aji panca paste in place of the chili powder and aji amarillo paste in place of the sriracha.
- *Split Chicken Breast: If your split chicken breasts are HUGE compared to the thighs, you can cut them in half crosswise down through the bone into 2 smaller pieces so all of the chicken cooks in roughly the same amount of time. Place your knife firmly on top of the chicken and wiggle it slowly so you can break the bone and the knife doesn’t slip. (Note that a “split” chicken breast [how they are typically sold] is named that because it is half of an entire bone-in skin-on chicken breast—the whole breast looks like a large heart shape.)
- **Jalapeños and Spiciness Level: Wear gloves or wash your hands immediately after handling jalapeños, being careful not to touch your eyes too! Adjusting the sauce spice level: For max spicy, keep the seeds of 1 jalapeño; for medium spicy, keep the seeds of 1/2 jalapeño. For the least spice (but still spicy), omit the seeds entirely. Keep in mind every jalapeño’s spiciness varies. Sometimes they can be very spicy and other times barely spicy. I’d opt for less to stay on the safe side. But if you’re spicy-obsessed, add however many seeds you think you can handle.
- TO STORE: Refrigerate leftover chicken and sauce separately in airtight storage containers for up to 3 days.
- TO REHEAT: Rewarm chicken on a baking sheet in the oven at 350°F or in the microwave.
- TO FREEZE: Freeze chicken in an airtight, freezer-safe storage container for up to 3 months. Let thaw overnight in the refrigerator before reheating. Prepare a fresh batch of the sauce.
Nutrition
Frequently Asked Questions
The origin of Peruvian chicken is not fully known. Some sources state that it originated in the Andes Mountains, while others believe that it came from the Peruvian coast. Regardless of its specific history, it is a popular dish throughout the country.
With lean, protein-packed chicken and an array of herbs and spices, the chicken itself and the marinade are nutritious. The green sauce also contains calcium-rich Greek yogurt, antioxidant-rich olive oil, and additional herbs and spices. Chicken is less healthy when it is fried (Peruvian chicken is not).
Authentic Peruvian chicken recipe is made with aji amarillo peppers, a type of chili pepper that is native to Peru. They’re medium-hot with a fruity, slightly sweet flavor. Since aji amarillo peppers can be hard to find, good substitutes for them are jalapeo, serrano, or habanero peppers. I prefer jalapeños, which are easy to find. They’re less spicy than aji amarillos, so you may want to add more if you prefer a kick.


This may be a bit of an odd compliment, but I went traditional Indian tonight – yet, I saw your sauce recipe with the classic ingredients that transcend both cultures, and thought, “What the heck?” So, my chicken curry with tomato, potato, ginger, garlic, onion, and curry spices got topped over leftover tri-colored quinoa. But I took your formula for the jalapenos/(lemon as opposed to lime,since that’s what I had), cilantro, onion, sour cream, salt/pepper, and pureed it for 3 minutes in the Cuisinart as a “topping” over the dish? It was AMAZING!!! Added a brightness, and an eye-opening flash of genius!!! It just worked so brilliantly well – my husband actually asked if I could keep the sauce on hand as a condiment for sandwiches, etc., he enjoyed it so much!!! I have a fair amount left over from tonight – I’m going to stir it into leftover mashed potatoes tomorrow, along with some fresh-cooked elements, and serve alongside chicken/black bean/sweet potato enchiladas… It will be as amazing this week as it was tonight! I have no doubt!!!
So glad it worked out for you Chrissie! Thank you!
Hey, Erin-
So what ended up being made was rustic mashed SWEET potatoes (threw an onion and some garlic in, for the last few minutes of boiling); drained, returned to pot. Mashed with a can of coconut milk (it was about #4 sweet potatoes), and quite a dose of your sauce – possibly as much as a cup? But (ready for this?): I used ground beef/garlic/onion/cilantro stems/ginger and made “chicken-fried steaks.” Your sauce? Your easy sauce? It wound up in the mashed potatoes – it wound up in the meat mixture! And, then, after the “chicken-fried Indian-style” steaks were done, as I was making gravy? It wound up there, as well!
It is a flavor BOMB!!! The perfect cross-continental condiment!!! As many peppers as I grow, each summer? I now have, like, literally, the perfect condiment (AND, for those who are dairy-sensitive – it works BRILLIANTLY with Greek yogurt, which my 1 dairy-free daughter tolerates, as well as with dairy-free “cream-cheese” and even almond-milk.” After the last weekend, I had all the kids experimenting!). Blessings!!!
I’m so happy that you are enjoying the sauce Chrissie!! Thank you!
This recipe is packed full of flavor. All four of my kids and I loved it!! The sauce is fantastic. I will absolutely be making this again.
Hi Angela! So glad you enjoyed the recipe! Thank you for this kind review!
This was delicious. Loved, loved, loved the green sauce!
Hi Jill! So glad you enjoyed the recipe! Thank you for this kind review!
Wow this was delicious. A little extra work to make the sauce but easy enough and we’ll worth it!
Hi Lauren! So glad you enjoyed the recipe! Thank you for this kind review!
Made the marinade and sauce the day before as they have some similar ingredients and kept them in the fridge.
On the day, marinaded the chicken as you suggested then cooked it in the oven while the rice boiled and I made a simple salad.
Delicious combination of flavours.
Got the thumbs up to make it again:-) Thanks, Erin.
So glad to hear you enjoyed it, Kasia! Thank you!
Love this recipe! Question, could I sub lemon for lime juice on the marinade? Was planning on making this family favorite tonight and only have enough lime juice for the sauce.
Hi Summer, I think it would be ok. Enjoy!
I would make this recipe again, but decrease the salt. I held some of the marinade and added some sour cream and it was a fabulous dipping sauce for our Yuca fries
Yum! Thank you Dawn!