This wet turkey brine recipe is the secret for Thanksgiving turkey so juicy, your guests will ask for the recipe! After brining dozens of turkeys over 15+ years, I’ve perfected the salt-to-water ratio, timing, and aromatics that transform a basic supermarket bird into something spectacular. This guide covers everything: brine ingredients, container options, safe refrigeration, soak time, and prep for roasting.

Email Me the Recipe!
From time to time, we'll send you Well Plated emails. You can unsubscribe anytime. Have an account? Log In.
5 Star Review
“Absolutely fantastic! My family couldn’t stop raving over this turkey! It was super-moist with tons of flavor…I highly recommend this turkey brine!”
— Paige —
The Best Turkey Brine, EVER
This wet brine recipe is based on the most moist turkey I’ve ever eaten (my stepdad Larry’s), plus testing and tweaks I’ve made over the years. It takes flavor cues from classic chef approaches (Pioneer Woman, Martha Stewart, Alton Brown), but the ratios below are what I actually use in my kitchen.
Whether you are roasting your first turkey or your fiftieth, this easy turkey brine produces fabulous, flavorful, JUICY results that will have everyone fighting over the leftovers!

What Is Brining?
Brining is the process of allowing meat to rest in a salt solution for about 24 hours prior to roasting.
It is THE most important step to cooking a moist roast turkey (other than not overcooking the meat).
- Brining works through osmosis. It tenderizes the meat and the meat absorbs the brine’s flavor, so the turkey tastes seasoned throughout, not just on the outside. (You can read more about brining science here).
- A brined turkey can better retain moisture. More moisture = juicier turkey.
- Brining allows you to flavor the turkey with herbs and spices; it particularly seasons the skin.
Wet Brine vs. Dry Brine
- Wet Brine (this recipe): The turkey is submerged in a flavorful saltwater solution.
- Works faster than a dry brine (12 to 24 hours, vs. 24 to 36 hours for dry)
- Must be rinsed off
- Produces incredibly juicy, slightly plumper meat
- Dry Brine: The turkey is rubbed on the outside with a combination of kosher salt, herbs, and seasonings, then left to sit in the refrigerator. Find my dry brine recipe here.
- Takes longer than wet brine (24 to 36 hours, vs. 12 to 24 hours)
- Less messy (no submerging or rinsing required)
- Moist, delicious results (just slightly less plump)
Bottom line: Any brining (wet or dry) is better than no brining.
If you’re short on time and want max juiciness, wet brine wins. If you want less mess, dry brine. I’ve used both with great results.
No matter which method you use, just be sure to keep your turkey cold (40°F or below) during the process to prevent bacterial growth.

Brining Equipment
You’ll need a few key pieces of equipment to brine a turkey.
- A Big Bucket. You need something large enough to hold the bird completely submerged in water, plus extra space at the top to weigh down the turkey if needed. If you are serious about wet brining turkey, consider purchasing a brining bucket. It has a special inner lid that keeps the turkey submerged and eliminates the need for a brining bag.
- A Great Big Stockpot. 12 quarts or larger will hold all of the brine, but if you only have an 8-quart stock pot, which is more standard in most pot-and-pan sets, you can wait to add any water doesn’t fit in the pot until the brine is in the bucket.
- A Brining Bag. For less-mess. You’ll place the turkey in the bag, then pour the wet brine on top. Note: if you are using a brining-specific bucket, you do not need a brining bag. The butcher will often give you one of these for free, or you can find one online. We usually do a double layer.
- Ice. Add ice to the brine to help the brine cool more quickly and keep the turkey at a safe temperature.
- Something to Weigh Down the Turkey. Turkey floats in wet brine, so you’ll want to stack something heavy on top of the turkey in the bucket to keep it submerged. I use a stack of several heavy plates. If you have a brining bucket, it comes with a lid to weigh it down.
- Lots of Paper Towels. Once you rinse off the brine, you’ll want to pat the bird very dry so the skin can get crispy.
- A Friend to Help. Turkeys are heavy and wet brine can get messy. If you have a friend to help you hold open the brining bag, pour the brine, lift the turkey, etc., it is much easier.

Wet Turkey Brine Ingredients
The only two 100% necessary ingredients in a wet turkey brine are water and salt, but if that’s all you use, you miss an opportunity to add extra flavor to the turkey.
Instead of only water, I make my turkey brine with apple cider or apple juice, then add whole spices, citrus, herbs, and brown sugar.
- Kosher Salt. You MUST use kosher salt, which is coarser than table salt. Table salt is iodized to keep it free flowing and will give a metallic taste to your turkey. I made this recipe with Morton’s brand kosher salt, because it’s widely available. If you’re using Diamond Crystal, substitute about 1 1/2 tablespoons Diamond Crystal for every 1 tablespoon Morton’s.
- Water. You’ll need about a gallon, plus additional for covering the turkey.
- Apple Juice or Apple Cider. Works in conjunction with the water to create a more flavorful turkey brine (you can use more water, plus a few tablespoons of brown sugar instead if you prefer).
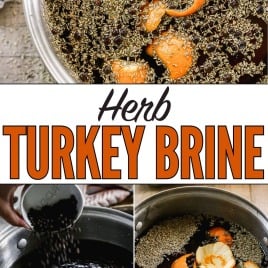
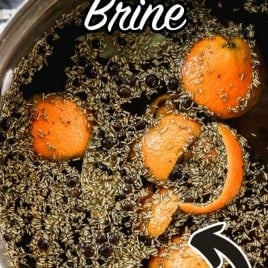
- Whole Spices. Black peppercorns along with allspice berries or cloves plus a cinnamon stick give the brine warmth.
- Herbs. Bay leaf and rosemary are wonderful herbs with turkey (you can use dried here; save the fresh herbs for roasting). If you have other herbs on hand, feel free to toss them in too.
- Citrus Peels. Orange is beautiful in harmony with the apple cider and spices.
- Brown Sugar. To offset the salt. I use a lesser amount since the apple juice already provides some sweetness.
How to Wet Brine a Turkey
Here is an overview of each brining step. For the full recipe breakdown, see the recipe card below.
Thaw the Turkey
- Plan on about 24 hours of thawing time per 4 to 5 pounds of turkey. Keep the turkey at or below 40°F while it thaws (never thaw on the counter). See How Long to Cook a Turkey for more.
- Whenever possible, I try to purchase a fresh turkey. It tastes great and skips the thawing stress.

Make the Brining Solution
- In a very large stockpot, combine all of the wet brine ingredients and bring them to a boil. Stir to dissolve the salt.

Let the Brine Cool COMPLETELY
- Let the brine cool completely before adding the turkey. Warm liquid can raise the turkey into the food safety “danger zone” (40°F to 140°F), where bacteria multiply quickly.
- Cooling can take well over an hour, so plan accordingly.

Place the Turkey in the Brining Bucket
- For easy cleanup, line the bucket with a brining bag first. Note that if you are using a special brining bucket, you will not need a bag.
- Don’t forget to check to make sure your bucket will fit in your refrigerator.

Transfer the Brine into the Bucket
- To help catch splatters, place your brining bucket in the sink while you pour so you can catch splashes and sanitize the area easily afterward.
- If your stockpot is too heavy to lift, use a ladle to transfer the brine.
Brine the Turkey for 12 to 24 hours
- Position the turkey in the brine, breast-side down. If it isn’t completely submerged in wet brine, add more water so it is covered.
- Tightly close the brining bag (I twist the top of the bag then use a rubber band to secure it), or secure the brining bucket lid. If the turkey wants to float, weigh it down (I use a stack of dinner plates).
- Brine the turkey in the refrigerator (or in a cooler or in your garage if it’s cold) for at least 12 and up to 24 hours. Any less and you won’t get the juicy results; longer and the turkey will start to break down and be too salty.
- The turkey should be kept below 40°F and above 32°F.
Remove the Turkey from the Brine and Rinse
- Wet brine MUST be rinsed off of your turkey, or it will be too salty.
- Remove the turkey from the brine and discard the brining liquid (don’t reuse it once it’s touched raw poultry).
- Rinse the turkey inside and out. To reduce splashing, clear your sink area first, run cool water gently, and immediately sanitize the sink and surrounding surfaces.

Dry the Turkey Skin
- Dry skin = crispy turkey!
- Once the brine is rinsed off, pat the turkey dry with paper towels.
- Refrigerate the turkey uncovered for several hours or up to 1 day to allow the skin to dry further so it roasts up golden and crisp.
Cook the Turkey
- Let the turkey come to room temperature for 1 hour prior to cooking (and don’t let it sit out more than 2 hours).
- Use this brine for any of your favorite turkey recipes: classic Roasted Thanksgiving Turkey, Spatchcock Turkey, Smoked Turkey, fried turkey, grilled turkey—they all taste great with this brine.

Using Leftover Turkey Brine
While you can’t reuse any turkey brine mixture that’s come into contact with the raw turkey itself, you can refrigerate or freeze unused extra brine from the stockpot. Try it with chicken (Baked Chicken Breast; Grilled Chicken Breast; Baked Chicken Thighs), pork (Baked Pork Tenderloin; Grilled Pork Chops), or brine an additional turkey breast.
Frequently Asked Questions
A careful cleanup is critical after you wet brine your turkey. First, make sure to wash your hands thoroughly and frequently throughout the entire process. Next, you should sanitize your sink with super-hot water and lots of soap after you rinse the turkey. If your turkey dripped on your countertops at all, make sure you use a sanitizing cleaner to disinfect it as well. Your brining bucket will also require a deep cleaning with scalding hot water, lots of soap, and a scrubbing sponge.
Normally, you do NOT rinse raw turkey, because rinsing can splash bacteria around your sink and it doesn’t make the turkey any safer to eat. The one exception is after a wet brine: you do want to quickly rinse off the excess brine so the turkey isn’t too salty. Do it gently in the sink, then sanitize the sink and faucet area right away.
The turkey needs to be mostly thawed so the brine can actually penetrate. You can brine a turkey that’s still somewhat icy, but the brine works best once the turkey is thawed. For thawing: allow about 24 hours in the refrigerator for every 4 to 5 pounds of turkey. Never roast a partially frozen turkey, because it will cook unevenly and parts will dry out.
The ideal brine time is 12 to 24 hours. Less than 12 hours won’t give you the full juicy impact, but longer than 24 hours can cause the meat to be mushy and overly salty.
A flavorful, brined turkey will certainly be the star of your Thanksgiving spread, but you still need to serve stellar sides. Check out my ultimate list of Thanksgiving Side Dishes for inspiration. You’ll find cranberries, stuffing, potatoes, vegetables, and so much more!

Turkey Brine
Video
Email Me the Recipe!
From time to time, we’ll send you Well Plated emails. You can unsubscribe anytime. Have an account? Log In.
Ingredients
- 1 gallon water (16 cups; 128 ounces), plus additional as needed
- 8 cups apple juice (1/2 gallon; 64 ounces), or apple cider
- 1 ¼ cups kosher salt NOT table salt
- ½ cup brown sugar light or dark
- 4 bay leaves
- 2 tablespoons black peppercorns
- 2 tablespoons dried rosemary
- 2 teaspoons allspice berries or 1 teaspoon whole cloves plus 1 cinnamon stick
- 2 peels of 2 large oranges
- 8 big, heaping cups of ice or 8 cups cold water
- 1 uncooked turkey up to 16 pounds – see notes if making a larger bird
Instructions
- In an 8-quart or larger stockpot (see note*), combine 1 gallon water, apple juice, salt, brown sugar, bay leaves, peppercorns, rosemary, allspice, and orange peels.

- Bring the liquid to a boil, stirring until the sugar and salt dissolve. Remove from the heat and let cool. (Budget time accordingly—after an hour, my liquid was still warm. Do not add the turkey to warm liquid, as it can raise its temperature into the food safety danger zone.)

- To brine, remove the neck and giblets from the turkey (discard or save for gravy). Line a large bucket, tub, pot, cooler, or other similar vessel large enough to hold the turkey and brine snugly with a brining bag. Place your uncooked turkey in the bag.

- Add the ice.

- Pour the brining liquid on top (if it is still a little warm, the ice will melt and cool it down). If the turkey is not completely submerged when pressed to the bottom of the container, add cold water until it is just covered. If desired, tie the brining bag closed. If the turkey floats, weigh it down with a heavy pot, bag of ice, or similar (we top ours with a stack of dinner plates that is about the circumference of the bucket).

- Let the turkey brine for 12 to 24 hours, ensuring that it stays below 40°F but above 32°F so that it stays safe but does not freeze. You can place it in a refrigerator, in your garage, or outside of it's cold (just make to actively monitor it so it stays below 40°F), or place bags of ice or cooling bricks around the turkey. Check the ice periodically and refresh as needed.
- When ready to cook, remove the turkey from the brine. Rinse it all over, inside and outside. Pat dry. Discard the brine, and (if time allows), refrigerate the turkey uncovered for several hours (or up to 24 hours) to dry the skin. Cook as desired. See How to Cook a Turkey and Spatchcock Turkey for two of the best ways to cook turkey.

Notes
- *STOCKPOT SIZE: If your pot is only 8 quarts, it will be VERY full but is manageable. If you’d like a little more spare room for the liquid to boil, hold back on 4 cups of the water while boiling, then add it to the brining bag with the ice at the end.
- WHAT IF MY TURKEY IS LARGER THAN 18 POUNDS? For an 18- or 20-pound turkey, increase the water, salt, and sugar by about 1.25. For example: for a 20-pound turkey, you’d use 20 cups water, 1.5 cups salt, and 3/4 cup sugar.
- Nutrition information was calculated using a 14-pound turkey. Since the brine is rinsed off, it is not included in the calculation.


My first time I used this brine was back in August this year on a 18lb turkey which I cooked in my smoker and it turned out amazing. It was hands down the most flavorful and juiciest turkey I ever made and the family loved it. I can’t wait to recreate this again for this year’s Thanksgiving.
We had an early Thanksgiving dinner with our Son’s family yesterday and I used your brine recipe. I followed your recipe exactly & used a cooler to brine it in. It was the second time I have brine a turkey. I am 55 years old & have cooked countless turkey dinners. This was the BEST turkey we have ever had, hands down! Thank you for sharing.
Would 3 gallons on water and 3 cups of salt be good for a 25lb turkey or should I add an extra gallon of water?
Hi Maggie! For a 25 lb turkey you’ll only need 24 cups water ( 2 gallons) and 1 3/4 cups kosher salt. Hope this helps!
Hi Erin,
Thanks for this! I am doing the spatchcocked turkey this year and using your wet brine recipe. I am getting it spatched first, then brining at home. It will be between 22-26 pound bird. 2 questions: 1. Should I double the wet brine recipe given the size? 2. Is the duration for wet brining the same with a spatchcocked bird? and 3. How long do you think it would take to cook?
Thank you!
I’m so confused Dean because I see it on my end. It’s right above the area where you commented. There is even a “jump to recipe” button at the top of the post that takes you directly to the recipe. Are you not seeing that on your end? Could you please check again?