

This easy method for juicy Baked Chicken Breast is a recipe everyone needs! With a few simple steps, you can make boneless skinless chicken breast in the oven that’s moist and flavorful every time.

5 Star Review
“Totally changed my chicken game! I can’t thank you enough. I had no idea that brining would make all the difference, as well as pounding. I use the wet brine for about two hours and invested in a digital read thermometer. Perfect every time!”
— Amy —
My 3 secrets to juicy baked chicken breasts.

Brining, pounding, and using a meat thermometer will take your boneless, skinless chicken breasts from dry and bland to tender and mouthwatering.
In fact, this method works so well, even my husband who usually prefers Baked Chicken Thighs enjoys it!
Season your chicken using one of the suggestions below, then make it for a fast, healthy dinner tonight, or dice it up and save it for meal prep during the week.
Prefer your chicken breasts with the bone-in and skin-on? Check out my Baked Bone In Chicken Breast recipe.

Ingredient Notes
You’ll find the full list of ingredients in the blog post below, but here are some notes to keep in mind.
- Boneless, Skinless Chicken Breast. Look for ones that are similar in size so they bake in the same amount of time.
- Brine. All you need is kosher salt (for a dry brine), plus water (for a wet brine). Or use a Chicken Marinade.
- Seasonings. Chicken breast is as mild and versatile as proteins come. Keep it simple with salt and pepper, or try one of the variations below.
Step-By-Step Instructions


- Pound the Chicken (photo 1). An even thickness prevents dry, rubbery ends and ensures each breast cooks evenly. (As a bonus, pounding can help make the meat more tender.)
- Brine the Chicken. For a dry brine (photo 2), salt the chicken and refrigerate it for 30 minutes or up to 1 day. For a wet brine (photo 3), submerge the chicken breast in a saltwater solution for 15 minutes or up to 4 hours.
- Season (photo 4). Toss the chicken with oil and spices, then lay it in a casserole dish (photo 5).
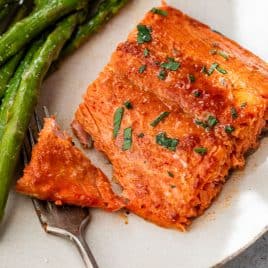
- Bake Chicken Breast at 425°F (photo 6). An instant read thermometer inserted into the thickest part of the chicken is the absolute best way to know when your chicken breast is done. Per the FDA, chicken breast is considered safe to eat at 165°F. Since the chicken’s temperature will rise as it rests, I remove mine between 155°F and 160°F.
- Rest. Let the chicken rest for 5-10 minutes to allow the juices to reincorporate back into the meat. If you cut too soon, your chicken breast will be dry.

Ways to Season Baked Chicken Breast
Once your chicken is brined, you can bake it right away, or add any seasonings you like.
If you’re using a blend of seasonings, stir them together in a small bowl, then scatter them over the chicken. Here are a few ideas to get you started.
- Spices. Paprika (or smoked paprika!), garlic powder, onion powder, red pepper flakes, or curry powder.
- Sweet and Spicy. Combine brown sugar with spicier ingredients like chili powder, cumin, and cayenne pepper.
- Seasoning Blends. Lemon pepper, everything bagel seasoning, Cajun seasoning, taco seasoning, or Italian seasoning.
- Herbs. Oregano, thyme, and rosemary all work well with chicken. For an easy blend, use Italian seasoning or herbs de Provence.

Ways to Use Baked Chicken Breast
- With Green Vegetables. We especially love ours with Roasted Broccoli and Roasted Brussels Sprouts with Garlic.
- With Potatoes. You can’t beat chicken and potatoes! Try Garlic Mashed Potatoes or Oven Roasted Potatoes.
- With Pasta or Rice. Serve your chicken with any of your favorite pasta or rice dishes (Mediterranean Pasta and Lemon Rice are two great options).
- On a Green Salad. Pump up the protein of your favorite salad (like this Spinach Strawberry Salad) by adding some chicken.

Baked Chicken Breast
Video
Email Me the Recipe!
From time to time, we’ll send you Well Plated emails. You can unsubscribe anytime. Have an account? Log In.
Ingredients
- 3 to 4 boneless, skinless chicken breasts (about 1 ½ pounds)
- Wet or dry brine see below
- 2 to 4 teaspoons extra virgin olive oil 1 teaspoon per breast
- 1 teaspoon paprika*
- 1 teaspoon garlic powder*
- ½ teaspoon kosher salt add ONLY if rinsing the chicken, plus additional to taste
- ¼ teaspoon ground black pepper*
- Additional seasonings of choice see blog post above for suggestions
FOR A DRY BRINE:
- 1 to 2 teaspoons kosher salt
FOR A WET BRINE:
- 4 cups warm water
- ¼ cup kosher salt
Instructions
- Place chicken breasts on a cutting board and lay a large piece of plastic wrap over the top to guard against splatters. With a meat mallet or rolling pin, pound the breasts into an even thickness.

- Pat the chicken breasts dry on both sides.
- TO DRY BRINE: Sprinkle the breasts generously on both sides with salt. Place in the refrigerator uncovered for 30 minutes or up to 1 day.
- TO WET BRINE: In a large bowl, stir together the warm water and salt. Place the chicken breasts in the water and let sit at room temperature for 15 minutes, or cover and refrigerate for up to 4 hours.
- TO COOK: Preheat the oven to 425°F. If the chicken is in the refrigerator, remove it. If dry brining, with a paper towel, wipe off the salt well from both sides (I do not rinse my dry brine). If wet brining, remove the chicken from the wet brine and rinse it off (to skip the rinse, omit any remaining salt from the recipe; your chicken will be salty but by no means inedible).
- Pat the chicken very dry on both sides, wiping away any clearly visible salt. If the chicken has been in the refrigerator, let it sit at room temperature for 10 minutes.
- Coat a ceramic or metal baking dish large enough to hold the chicken in a single layer (such as a 9×13-inch baking dish) with nonstick spray. (I do not recommend using glass/Pyrex, as the way it conducts heat will not cook the chicken as evenly. If needed, you can bake the chicken on a metal baking sheet.)
- Place the chicken in a large bowl (if wet brining, rinse out, dry, and reuse the same bowl if you like). Add the olive oil, paprika, garlic powder, salt (only add the salt if you rinsed your chicken), and pepper. Toss to coat the chicken evenly, then arrange it in the baking dish.
- Bake the chicken for 14 to 16 minutes (for small/medium breasts that are about 6 to 7 ounces), 16 to 20 minutes (for medium/large breasts that are 8 to 10 ounces), or 20 to 25 minutes (for larger breasts). For absolute best results, use an instant read thermometer. When the breasts reach 165°F, they are done.
- REST: Transfer the chicken to a plate or cutting board. Cover and let rest for a minimum of 5 minutes. Slice, dice, or shred as desired. Enjoy!


Notes
- *Feel free to swap out these seasonings for the suggestions in the blog post above.
- If your chicken breast comes pre-brined (sometimes it is sold this way) skip the brining step.
- No time to brine? I suggest Pan Fried Chicken Breast, which doesn’t need it to turn out juicy.
- You must thaw chicken breast before cooking! If it’s still frozen, make Air Fryer Chicken Breast instead.
- TO STORE: Refrigerate chicken breast in an airtight storage container for up to 3 days.
- TO REHEAT: Gently rewarm chicken in a baking dish in the oven at 350°F.
- TO FREEZE: Freeze leftovers in an airtight freezer-safe storage container for up to 3 months. Let thaw overnight in the refrigerator before reheating.


My favorite easiest to make meat recipe. Had it just last week. My sister, who knows how to cook, even commented on how moist and flavorful it was on a past visit. I’ve made this one more than any other meat recipe. Usually pair it with some veggies.
Totally changed my chicken game! I can’t thank you enough. I had no idea that brining would make all the difference, as well as pounding. I use the wet brine for about to hours and invested in a digital read thermometer. Perfect every time!
So happy to hear you enjoyed it, thank you Amy!
Totally changed my chicken game! I can’t thank you enough. I had no idea that brining would make all the difference, as well as pounding. I use the wet brine for about two hours and invested in a digital read thermometer. Perfect every time!
Makes me so happy to hear, thank you Amy!
I followed all instructions (wet brine) and cooked three large chicken breasts on 425 for 30 minutes and at the outset I had three of the palest, least appetizing chicken breasts I’ve ever seen.
I needed to broil them for five minutes to get some color which subsequently dried them out… I made a second batch without broiling them for color and the taste was fine, but I def got a few stares from the dinner table like I’d lost my mind presenting these pale meat saucers instead of the golden brown cutlets my fam is used to so I’ll return to pan-frying.
Hi Courtney, I’m sorry to hear you had trouble with the recipe. Did you happen to use paprika or change any of the seasonings in step 6? How much olive oil did you use in this step? Did you view the video? At the 1:30 second mark, you’ll see how mine looks out of the oven without broiling. If choosing broiling, it shouldn’t take five minutes. I’d raise the rack or put it on the top rack, wait till it’s completely hot, then put the chicken in and let it broil for 1 minute. Did you happen to catch a picture of it?
Really good and oh so easy!! Although did the “dry brine”, I did rinse the salt off prior to using the olive oil and other seasonings. There was still plenty of salt taste. The chicken was not dry and had great flavor.
Great to hear, thank you Shari!
As someone who’s new to cooking, I was nervous about making chicken breast because it’s so easy to mess up. This recipe made it easy for me! The instructions were so easy to follow, and my chicken came out perfectly juicy and tender. I can’t wait to try it again and maybe add some different spices next time.
Makes me so happy to hear! Thank you Alexa!
I was short on time tonight and needed something easy, so I gave this recipe a try. I couldn’t believe how flavorful the chicken turned out with such simple ingredients. My family loved it, and I’m already planning to make it again next week. Thank you!
Makes me so happy to hear, thank you Ellie!
I’ve tried so many baked chicken breast recipes, and they always come out dry, but this one is a game changer! The seasoning blend was spot-on, and the chicken stayed so moist. I followed the recipe exactly and was amazed by how juicy it turned out. This will be a weekly staple in my house. Even my picky kids devoured it and no leftovers!
Glad to hear you enjoyed it, Ruby! Thank you!
Love love this recipe and so does my entire household 😀game changer !!! And I can pair it in do many different ways! Salad, veggies, etc! Love how easy and yummy it is!! Ty!!
So glad to hear, thank you Veronica!
My husband doesn’t like chicken breast, period, unless it’s in a stir-fry. I found a single, large chicken breast buried in the freezer but, since many range exhaust isn’t working, I looked for baked recipes and settled on this one.
The high rating is well-deserved. I used the wet brine and my husband must have told me how good, how tender, this chicken was at least a half-dozen times! This recipe, and chicken breasts, will be in our regular rotation from now on. Thanks, Erin!
Amazing news!! Thanks so much for sharing!