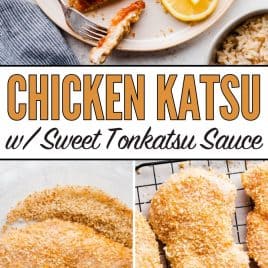
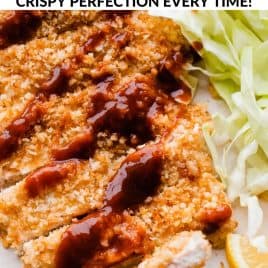
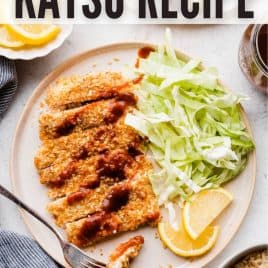
Chicken Katsu—Japanese-style breaded chicken breast—is juicy, crispy, and absolute perfection when drizzled with sweet tonkatsu sauce. My version is oven-baked to keep it light!

Japanese comfort food that’s easy to make at home.

The first time I tried chicken katsu was at a hole-in-the-wall restaurant in Tokyo. It was a damp winter day, and we were tired and hungry.
We followed our noses to a tucked-away basement restaurant, grabbed our picture menus, and pointed at what looked like the ideal meal for the moment: juicy chicken breaded, fried, and served with a sweet, sticky Asian sauce called tonkatsu.
Chicken katsu is similar to other cultures’ versions of crispy chicken, such as southern Baked Fried Chicken, popular European dishes like schnitzel, and American-Italian Baked Chicken Parmesan. What sets chicken katsu apart is how it’s pounded thinly, coated in panko breadcrumbs (which makes it extra crunchy), and served with shredded cabbage, rice, lemon wedges, and tonkatsu sauce.
It was simple, satiating, and exactly what the moment needed. Years later, it still hits the spot!
Key Ingredients
You’ll find the full list of ingredients in the recipe card below, but here are some notes to keep in mind.
- Chicken. Pounding the chicken cutlets until they’re nice and thin helps make them more tender. Plus, they cook in a flash! You can purchase chicken that is already sliced into cutlets or cut your own. (I also suggest cutlets for this Chicken Francese recipe.)
- Panko. Creates the perfect crispy, crunchy coating (like on Air Fryer Chicken Tenders).
- Flour + Egg. Helps the egg and breadcrumbs adhere to the outside for maximum crispiness.
How to Make Chicken Katsu


Prep the Chicken. Pound the chicken cutlets and season with salt and pepper.
Set Up the Dredging Stations. Toast the breadcrumbs in a pan with butter—this helps mimic the flavor and texture of fried chicken katsu. Add the flour to a separate bowl. In another bowl, beat the egg.
Dredge the Chicken. Lightly dredge each chicken cutlet in the flour. Then, dip it into the egg mixture. Finally, dip it into the breadcrumbs. Make sure the chicken is well-coated for maximum crispiness!
Arrange on Rack. Lay the cutlets on baking trays topped with an oven-safe rack, then coat each one with nonstick spray.
Cook. Bake chicken katsu at 425 degrees F for 12 to 14 minutes (or until it registers an internal temperature of 160 degrees F on an instant-read thermometer). Remove and let rest for 5 minutes. Serve with tonkatsu sauce and desired sides. I often top with green onion too. ENJOY!

Recipe Variations
- Try It in the Air Fryer. Follow the recipe as directed through Step 6. Coat an air fryer basket with nonstick spray. Cook the chicken cutlets in a single layer (you may need to do a few batches) at 390 degrees F for 4 minutes. Flip the chicken over, then cook for another 2 to 5 minutes or until it is cooked through.
- Make It Gluten-Free. While I haven’t tested it, you could experiment with swapping the flour and panko bread crumbs in this recipe for your favorite gluten-free alternatives. If you give it a try, I’d love to hear your results.
- Swap Out the Dairy. To make dairy-free chicken katsu, swap the butter for canola oil, a similar vegetable oil, or olive oil.
- Use Chicken Thighs. Feel free to experiment with using thighs if you prefer dark meat. Take note that the cooking time will be different since thighs cook differently than breasts. Use 4 large chicken thighs for this recipe and remove any excess fat or gristle.
More Japanese-Inspired Recipes

Chicken Katsu
Video
Email Me the Recipe!
From time to time, we’ll send you Well Plated emails. You can unsubscribe anytime. Have an account? Log In.
Ingredients
For the Chicken Katsu:
- 4 chicken breast cutlets*
- ¾ teaspoon kosher salt divided
- ¼ teaspoon ground black pepper
- 2 tablespoons unsalted butter**
- 1 cup panko breadcrumbs
- ¼ cup white whole wheat flour or all-purpose flour
- 1 large egg
- Nonstick cooking spray recommended: olive oil spray
For Serving:
- Tonkatsu sauce***
- Finely shredded cabbage
- Lemon wedges
- Cooked rice white is traditional; use brown rice for a nutritional boost or cauliflower rice
Instructions
- Position an oven rack in the upper third of the oven and preheat the oven to 425 degrees F.
- Line a rimmed baking sheet with parchment paper. Place an oven-safe rack on top and coat generously with nonstick spray and set aside.
- Lightly pound the chicken cutlets into an even 1/2-inch thickness. Sprinkle the chicken cutlets with 1/2 teaspoon kosher salt and black pepper.

- In a medium skillet, melt the butter over medium heat. Add the breadcrumbs and remaining 1/4 teaspoon salt. Stir to coat the breadcrumbs with the melted butter. Let cook, stirring constantly, until the breadcrumbs are lightly toasted and turning golden brown, about 2 minutes. Transfer to a wide, shallow bowl or dish (a pie plate works well).
- In a separate shallow bowl, place the white whole wheat flour. In a third shallow bowl, beat the egg.
- Set up your workstation: chicken, flour, egg, panko, baking sheet. Working one at a time, dip each chicken cutlet lightly in flour to coat on all sides. Shake off the excess.
- Then, dip the chicken in the egg.
- Finally, dip the chicken into the panko. Pat the panko as needed so that it adheres. Arrange on the baking sheet so the cutlets are not touching. Mist the tops with nonstick spray.
- Bake the chicken katsu in the upper third of the oven, until the chicken is cooked through (it should reach an internal temperature of 165 degrees F; I pull mine out several degrees early and let the carryover cooking finish the rest), about 12 to 14 minutes.
- Remove from the oven and let rest 5 minutes.
- To serve, cut the chicken katsu into thin slices (if desired). Drizzle with the tonkatsu sauce. Serve with cabbage, a small bowl of rice, and lemon wedges, with the extra tonkatsu sauce in a bowl alongside.


Notes
- *Chicken breast cutlets are chicken breasts that have been split in half horizontally to create two thinner pieces of chicken. You can buy them already cut or carefully cut your own. Or, you can pound very small chicken breasts to a 1/2-inch.
- **Traditional chicken katsu is deep-fried in vegetable or peanut oil; to mimic that indulgent spin, I toast the panko breadcrumbs in melted butter; if you prefer, you can toast them in canola oil or olive oil.
- ***Tonkatsu sauce is available at many supermarkets or at your local Asian grocery store. Or, you can make your quick version by combining 2 1/2 tablespoons ketchup, 2 tablespoons Worcestershire sauce, and 1 tablespoon oyster sauce. Add a pinch or two of sugar to taste (sauce adapted from Just One Cookbook).
- TO STORE: Refrigerate chicken in an airtight storage container for up to 2 days.
- TO REHEAT: Rewarm leftovers on a baking sheet in the oven at 350 degrees F or in the microwave.
- TO FREEZE: Freeze chicken in an airtight, freezer-safe storage container for up to 3 months. Let thaw overnight in the refrigerator before reheating.


Wow, so good! Toasting the panko was a game-changer.
Hi Natalie! So glad you enjoyed the recipe! Thank you for this kind review!
Can this made the day before then popped in oven?
Hi Dna, you can rewarm leftovers on a baking sheet in the oven at 350 degrees F or in the microwave. Enjoy!
Perfect recipe! For some reason, chicken breasts are so gigantic anymore that I almost always split them in half this way. I actually asked the butcher why and he only said that sometimes they get “pigeon-size” and other times they’re “turkey-size” or larger. Clears that right up, huh? Anyway, cutting them this way makes them so much more uniform to cook.
Glad you enjoyed it, Chris! Thank you!
I loved that I didn’t have to fry anything but still ended up with crispy, golden chicken. The panko stayed perfectly crunchy, and the chicken was so juicy. I served it with steamed rice and a side of miso soup. We’ll definitely be making this again! Thank you so much for the recipe!
So glad to hear you enjoyed it, Bridgette! Thank you!
Amazing!!! All I had were chicken thighs so I pounded them out, cut them in half and they were delicious. I had those in the oven for a few extra minutes. Soooo crispy with barely any oil used! I served it over rice with tonkatsu sauce and a daikon slaw.
So glad to hear! Thank you Maggie!
This recipe blew me away. I’ve tried making chicken katsu before, but this version nailed it. The instructions were super easy to follow, and baking the chicken was such a great idea. It was crispy on the outside, tender on the inside, and didn’t feel heavy at all. This one’s a keeper for sure!
Yay! So glad to hear, Kassy!
Came out great, crispy, flavorful, juicy chicken. Added some Japanese bbq sauce after. Really easy to follow recipe and worth making.
Glad you enjoyed the recipe, Jessica! Thank you!